Author:
Eric Farmer
Date Of Creation:
11 March 2021
Update Date:
15 May 2024

Content
- Steps
- Method 1 of 4: Cutting plywood with a hand held circular saw
- Method 2 of 4: Cutting plywood with a table saw
- Method 3 of 4: Using a hand-held circular saw to cut a plywood sheet
- Method 4 of 4: Cutting plywood with a simple handsaw
- Tips
- Warnings
- Similar articles
If you are going to do any kind of construction or carpentry work, then at some stage you may need to cut something out of the plywood. At the same time, plywood sheets are usually quite large and rather difficult to cut, especially in the absence of special tools. But if you remember a few basic rules, then you can easily cut plywood with a simple hand or circular saw, also called circular. The main thing is that your saw blade is sharp, and the plywood sheet itself remains stable.
Steps
Method 1 of 4: Cutting plywood with a hand held circular saw
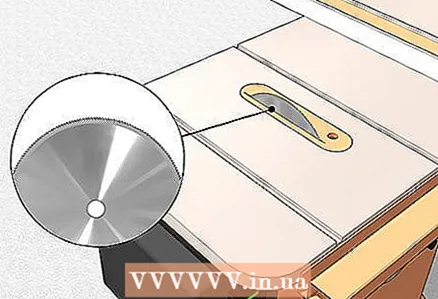
 1 Choose the correct blade type. To get a clean cut on plywood, you need to use the correct type of blade for your circular saw. Look for a carbide blade with a lot of teeth.
 - You can even find special "plywood" saw blades in the store, however check the number of teeth on them.
- Circular saw blades come in a variety of sizes, so make sure the saw blade you choose will fit your saw.
- If you decide to cut the plywood with the "native" blade of your circular saw, then, most likely, the sawn edge of the plywood will turn out to be jagged and torn.
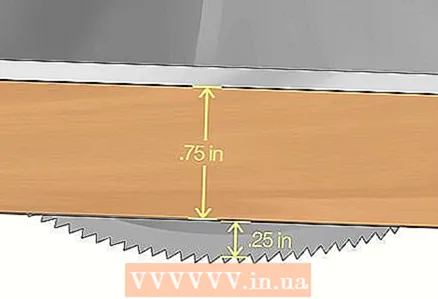 2 Set the saw to the correct cutting depth. Adjust the depth of cut on the saw before cutting the plywood. If the cutting depth is too deep, the saw blade will pull through the cutting point once more. If the cutting depth is too small, then you risk not cutting the plywood to the end.
 - It is necessary to make sure that at the time of cutting the saw protrudes 5 mm deeper than the underside of the plywood. If you are sawing a 2 cm thick plywood sheet, the cutting depth on the saw should be 2.5 cm.
 3 Support the plywood sheet. When plywood needs to be cut, it is very important to support the plywood sheet on both sides of the cut line.
 - Place a few 5x10 cm beams under the plywood sheet, which will provide it with support when cutting. Save 5x10 cm beams exclusively for this purpose, since at the time of cutting the plywood, the circular saw will cut into their upper edge.
- If there are no wooden beams at hand, then instead of them you can take a sheet of foam insulation. Place it on the floor and place a sheet of plywood on top. Make sure the plywood does not slide over the surface of the foam sheet.
- If you decide to use foam insulation, then you can safely move along the surface of the plywood sheet during cutting, and also not worry about the fact that the plywood sheet may break off at the end point of the cut.
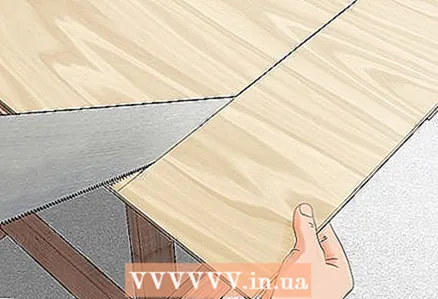
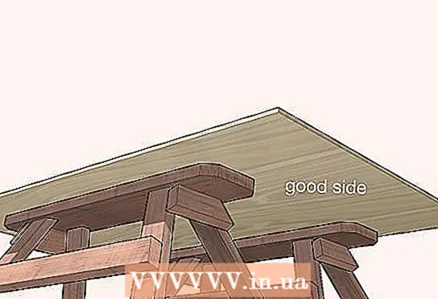 4 Saw plywood face down. To cut the plywood with a hand-held circular saw, it must be laid face down. In this case, the saw teeth will enter the base of the plywood from the front side and exit from it from the back side. When the saw teeth come out of the plywood, they may tear slightly at the edge of the cut. Therefore, stacking the plywood face down will provide a neat appearance of the cut line on the face of the sheet.
  5 Pre-mark the cutting line. Use a large ruler to mark the cutting line.Place the marks carefully and make sure to draw a line at right angles to the edges of the plywood sheet.
 - To make the cut smoother, make a notch on the plywood along the line of the future cut. Take a construction knife and draw it along the marked line with the blade. You may need to run your knife along the line several times to get a complete serif.
- A good clue in this case is the saying "measure seven times, cut once." If you make a mistake when sawing, it can only be corrected by taking another sheet of plywood and starting from the beginning.
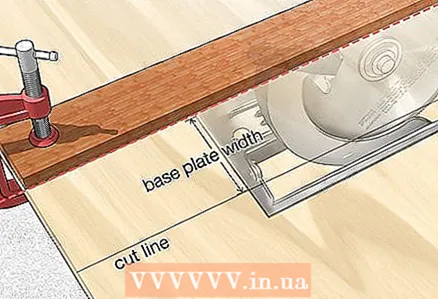 6 Use a guide when cutting. Find a piece of plywood that still has a smooth factory edge, place it on a whole sheet of plywood parallel to the cutting line and secure with a vise.
 - Consider the width of the saw shoe when attaching the guide. Position the guide in such a way that the saw shoe fits snugly against it when cutting, and the blade is exactly in the cutting line.
- If you have to cut a lot of plywood, then it would be wise to think about purchasing a special rail that attaches to the circular saw itself. You can search for it in online stores or in the nearest shops selling tools.
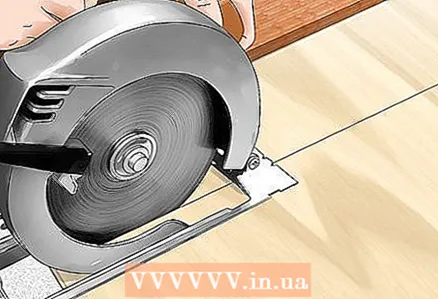 7 Saw the plywood. Place the saw on the guide and check again that the blade is in line with the cut. Turn on the saw and slide the shoe along the rail. Try to cut as smoothly as possible.
 - Working with a circular saw is dangerous. Be sure to wear safety glasses and keep your fingers away from the blade.
- Pay attention to the power cord from the saw when working with it. Keep the work area clean.
Method 2 of 4: Cutting plywood with a table saw
 1 Choose the right blade. To get the most straight cut when working with a table saw, you will have to invest in a special blade with a large number of teeth, for example, buy an 80 TPI saw blade for plywood (80 teeth per inch).
 - Most of the "native" table saw blades are only suitable for rough cuts, which will not give you neat cut edges.
- As an alternative to purchasing a saw blade, you can place a gap-free saw insert under the plywood to be cut. To make it, simply gently place a whole sheet of plywood on the table with the circular saw running, making sure that the plywood does not slip or fall out of your hands. When the saw has completely cut through the sheet (the blade should be raised high enough), fix the cut sheet on the table with a vise. A self-made plate will no longer allow the underside of the sawn sheets to split, since there will be no gap between the saw and the saw hole in the table. You will donate one sheet of plywood to get the job done well, so it only makes sense if you need to cut a lot of plywood.
 2 Raise the saw blade. Raising the saw blade changes the direction with which the blade teeth enter the wood. When the disc is raised just a little, its teeth barely cut through the thickness of the plywood and enter the wood at an angle. If you raise the disc higher, then you can achieve perpendicular entry of the teeth into the base of the plywood, which will make the cut more even.
 - Do not raise the saw blade more than 2.5 cm above the cutting surface. A raised saw blade not only produces a smoother cut, but also becomes more dangerous. Exercise extreme caution when working with a table saw with the blade raised high.
 3 Ensure that the saw blade has a backlash-free fit. Your table saw may initially have some gap between the blade itself and the edges of the hole in which the blade is installed.The gap-free fit of the blade does not have such a gap, which provides better support for the plywood sheet being cut and gives a smoother cut.
 - A dedicated table saw blade can be purchased online or at your local power tool store.
- Alternatively, you can make your own backlash-free plate. First, carefully lower a sheet of plywood onto a table with your circular saw turned on, making sure that the plywood does not slip or fall out of your hands. When the saw has completely cut through the sheet (the blade should be raised high enough), fix the cut sheet on the table with a vise. A self-made plate will no longer allow the underside of the sawn sheets to split, since there will be no gap between the blade and the saw hole in the table. In this case, to make a plate, you will need to sacrifice a whole sheet of plywood, so this is only reasonable when you need to saw a very large number of plywood sheets. To carry out all the work safely, be sure to check that the sheet to be cut is supported on the underside and is not skewed.
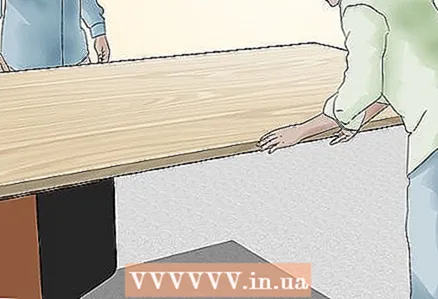 4 Support the plywood sheet securely. Large sheets of plywood are quite heavy. When you cut them with a table saw, you need to support them from the beginning. For this, special trestles can be used, in addition, you can ask a friend for help to help support the sheets.
 - Providing full support to the plywood sheet will allow you to better monitor the evenness of its feed to the saw blade (the speed at which you cut it).
- The circular saw can also be used to cut large sheets of plywood into smaller ones that are easier to work with.
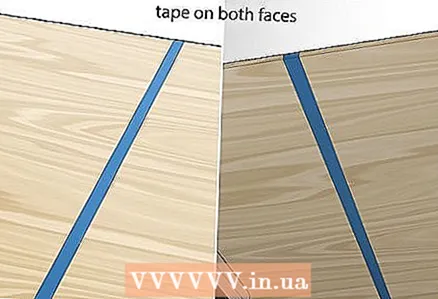 5 Tape the area of the future cut with tape. Take a low-tack tape, such as masking tape, and glue the cut line on both sides of the sheet with it. The tape will help the wood fibers stay in place and avoid splitting.
 - When the sheet has been cut, carefully peel off the tape so that it does not accidentally pry off the chips along the edge of the cut.
 6 Lay the plywood sheet face up to cut. Place a sheet of plywood face up on a table with a circular saw. So the teeth will enter the base of the sheet from the face, and go out from the back. Jagging, or chipping, appears on the side of the plywood where the saw teeth come out, so it is very important that the plywood sheet is face up.
  7 Saw the plywood. Support the sheet securely and make sure it is pressed well against the guide edge of your table saw. Use both hands to feed the sheet onto the working saw blade.
 - With the hand closest to the blade, move the sheet forward, and with the hand farthest from the blade, adjust the position of the sheet so that the cut occurs strictly along the marked line.
- At the final cut point, place your hands on the plywood on either side of the saw blade and very carefully slide the remainder of the sheet through the blade.
- Be careful when working with the table saw. Do not keep your hands too close to the working blade.
Method 3 of 4: Using a hand-held circular saw to cut a plywood sheet
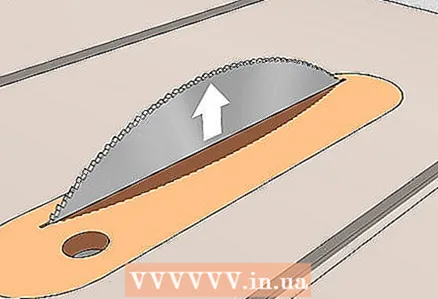
 1 Support the plywood sheet securely. Place a sheet of plywood on top of several 5x10cm beams resting on a pair of trestles. The entire plywood sheet must be securely supported.
 - The cut does not start from the edge of the plywood sheet, but is cut somewhere in the middle. If you need to make a hole in plywood, then you need to know how to make such a cut correctly.
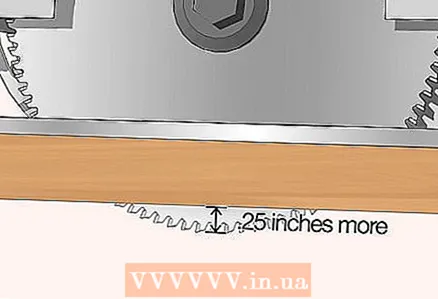 2 Set the correct cutting depth. Lower the saw blade to a level where the cutting depth is only 5 mm greater than the thickness of the plywood to be cut. This way the saw blade will barely cut through the wood from the underside.
  3 Stand to the side of the direction of the saw. When a cut is made on the plywood, there is a high risk of kickback in which the hand-held circular saw jumps forward in the direction of the blade rotation. Never stand directly in front of the saw when making a cut.
 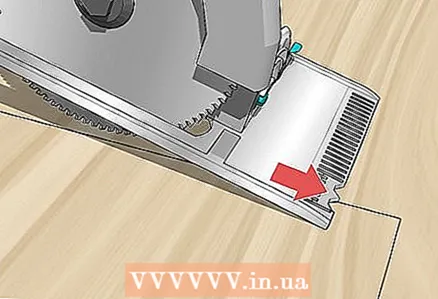 4 Adjust the saw for the desired cut. Place the front of the saw shoe against a sheet of plywood. Carefully lift up the saw guard and align the blade precisely along the marked cutting line.
 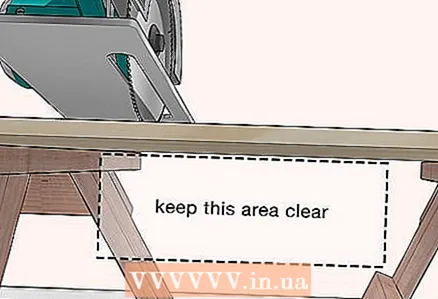 5 Make sure everything is clean on the underside of the sheet. When you cut, you will not be able to see what is under the sheet. Therefore, it is reasonable to make sure that there is nothing superfluous from below before starting work.
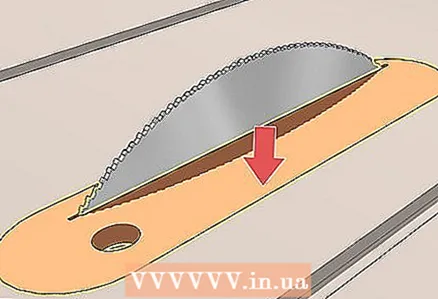
 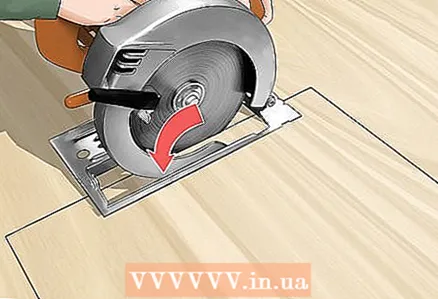 6 Immerse a running saw in the plywood. Turn on the saw and slowly submerge the blade into the wood. Hold the tool firmly to prevent kickback.
 - When the saw is fully lowered into the notch and the shoe is fully seated on the plywood surface, replace the guard. Slide the saw all the way along the notch line. Turn off the tool, wait until the blade has come to a complete stop, and only then remove the saw from the slot.
Method 4 of 4: Cutting plywood with a simple handsaw
 1 Get a good saw. If you do not have the opportunity to use power tools, then you will have to spend money on a regular hand saw. Pay attention to the frequency of her teeth. A saw with fewer teeth will cut faster, but the edges of the cut will be jagged. A saw with more teeth will produce a cleaner cut, but you will spend more time getting the job done.
 - Make sure the saw handle is comfortable for you. Also take a look at the back of the saw blade to check if it is even. The end of the saw should be flexible enough. If you bend the end and release, the saw should spring back and return to its original straight position.
 2 Mark the cutting area. When working with wood, the first thing to do is to mark the cutting site. Once the tree is sawn, there will be no way back. Double-check your measurements several times before starting work.
  3 Make a serif. Hold the saw upright and place it against the edge of the plywood you are cutting. Pull the saw up several times so that the teeth follow the starting point of the cut and form a notch.
 - To guide the saw blade along the cutting line, you can adjust its position with the knuckle of the thumb of the other (non-primary) hand. However, be careful when doing this.
 4 Start sawing. When the notch is ready, tilt the saw blade towards the surface of the plywood, making an angle of 45-30 degrees. Work carefully. To cut the plywood, you must smoothly drive the saw along its entire length.
 - In order for the cutting line to be straight, the shoulder and forearm of the working hand must move in the same plane as the saw.
- If you notice the blade is slightly off to the side, bend the saw slightly in the desired direction and continue sawing to return to the intended cutting line.
 5 Hold the piece to be cut at the end of the cut to avoid kinking. When the work comes to an end, you need to hold the piece to be sawn off with your free hand. Return the saw to a vertical position and finish with a few short vertical strokes.
Tips
- Be sure to measure everything carefully. Even if you find the job to be done easy, your measurements must be accurate. Do not forget that it is better to "measure seven times and cut once."
Warnings
- Always keep an eye on the power cord when working with a circular saw.
- Be sure to set the correct cutting depth.
- Measure seven times and cut once. Make sure to cut at the correct angle and distance. Plywood sheets aren't cheap to spoil!
- Be sure to wear safety glasses and gloves.
- Make sure to use a sharp saw blade. A dull blade is more dangerous than a sharp one.
- You must know how to work with your equipment. Be sure to read the instructions carefully before using any power tool.
- Keep your hands away from the saw blade.
Similar articles
- How to make a wooden bed frame
- How to artificially age a wooden surface
- How to make a crossbow
- How to make a wardrobe
- How to make a beehive
- How to bend plywood
- How to burn wood
- How to make a wooden box


