Author:
Carl Weaver
Date Of Creation:
25 February 2021
Update Date:
16 May 2024

Content
The PCSX2 emulator allows you to run Playstation 2 games on your computer. The control keys are configured the first time you start the program, where you will be offered two joystick plug-ins: LilyPad and Pokopom. Unlike Pokopom, which only supports joysticks (apart from advanced features like pressure sensitivity), the LilyPad supports keyboard and mouse input. When the initial configuration is done, you can change the active plug-in or reset the keybindings in the "Settings" menu.
Steps
Method 1 of 2: Using the LilyPad
 1 Connect your input device to your computer. The LilyPad can use a keyboard, mouse, Xbox 360 controller, and third-party controllers as a controller.
  2 Download and run PCSX2. Go to http://pcsx2.net/download.html and select the installer for your platform. The first launch of the program will be accompanied by a setup wizard.
 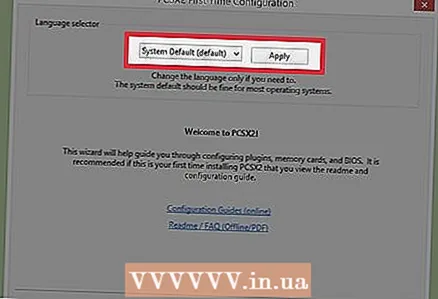 3 Choose language. The system language will be selected by default. Click "Next" to proceed to configuring plugins.
  4 Select "LilyPad" from the "PAD" drop-down menu. The PAD menu is second in the list of plugins.
 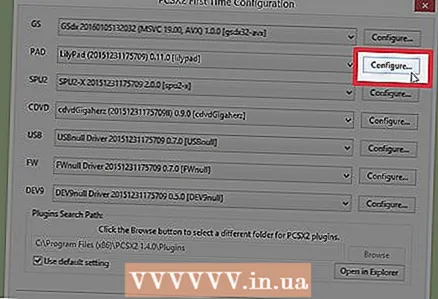 5 Click Customize to the right of the PAD menu to go to the list of options for customizing the LilyPad plug-in.
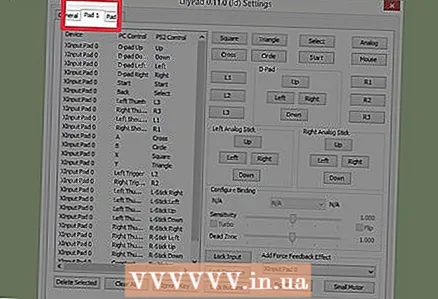 6 Select "Pad 1". This tab is located at the top of the window and is used to customize the control keys of the connected device. On the right side of the window are interactive buttons that allow you to assign a key to each button on your PS2 controller.
  7 Press the button to enter edit mode. For example, to assign a key to the Triangle button on your PS2 controller, press Triangle.
  8 Press the key or button that you want to bind to this button. The new configuration will appear in the list of saved bindings on the left side of the window.
 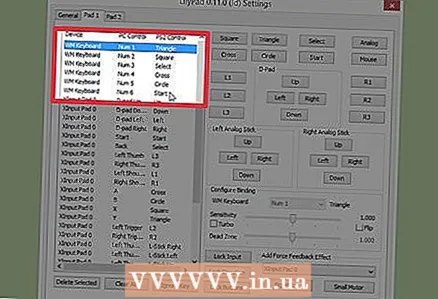 9 Repeat the same steps for the other buttons on the controller. Buttons that are not key bound will not work.
  10 Adjust Sensitivity ”(optional). The sensitivity slider is located in the Configure Binding section of the preferences window. Move the slider to the left to decrease the sensitivity, or to the right to increase it.
 - Sensitivity can be adjusted for all buttons, but it is usually most effective with trigger or analog stick movements to capture partial button presses.
- Similarly, you can use the Dead Zone / Insensitivity slider to set the waiting window, within which the program will not register a partial key press.
 11 Enable and configure Turbo (optional). Check the box next to Turbo in the Snapping Options section of the Preferences to enable Turbo mode.
 - Turbo mode reproduces a quick press of a button when it is held down. This is a useful feature for games where you need to press buttons quickly, but will be a hindrance in cases where the button needs to be held down.
 12 Click Delete Selected (optional). Select an anchor from the list on the left and click this button to remove the anchor.
 - The Clear All button will delete all links. Keep in mind that this action will not reset your changes, but will remove all bindings for the device.
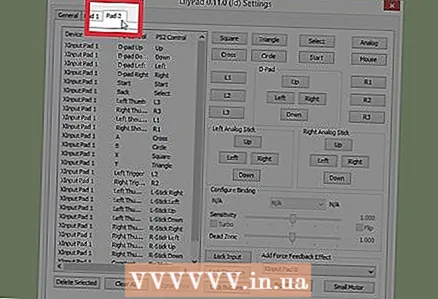 13 Configure a second input device (optional). Select "Pad 2" and repeat the previous steps to configure the buttons for the second user.
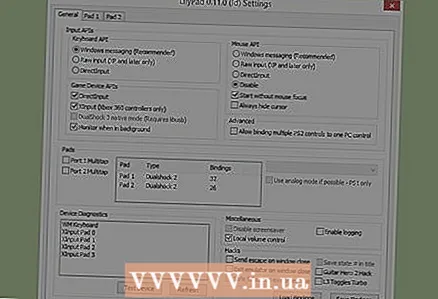
  14 Change the input API if you encounter problems. For troubleshooting, open the General tab and try switching the API for the type of input you are using. Alternative command handlers may work better with specific input devices.
 - API parameters are divided by input devices: keyboard, mouse and game devices (controller).
 15 Click Apply or OK to save the settings. The "OK" button will close the window.
Method 2 of 2: Using Pokopom
 1 Connect your input device to your computer. Pokopom only supports controller input and can enable features such as vibration and pressure sensitivity. Pokopom also supports guitar-style controllers like those used in Guitar Hero games.
  2 Download and run PCSX2. Go to http://pcsx2.net/download.html and select the installer for your platform. The first launch of the program will be accompanied by a setup wizard.
  3 Choose language. The system language will be selected by default. Click "Next" to proceed to configuring plugins.
  4 Select "Pokopom" from the "PAD" drop-down menu. The PAD menu is second in the list of plugins.
  5 Click Configure to the right of the PAD menu to go to the list of options for configuring the Pokopom plugin.
 6 Select Xinput controller. Select the device under Xinput Controller in the upper left corner of the window. Do not change this value if you are connecting only one gamepad to your computer.
 - Xinput supports automatic PS2 controller emulation with Xbox360 controller. The buttons will automatically be mapped to their counterparts on the PS2 controller.
- Xinput is bundled with Pokopom so you don't need to download it separately.
- For minor button remapping, select Swap [X] [O] buttons in the Misc category to swap the two functions together.
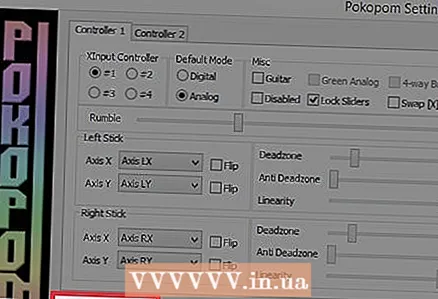
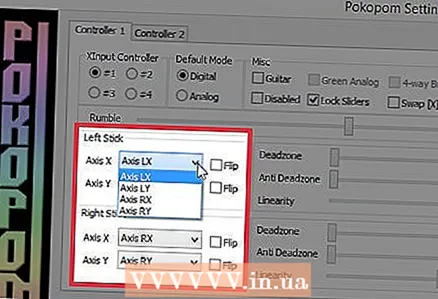 7 Adjust the directions of the analog joystick axes. In the sections "Left Stick" and "Right Stick", which are located in the lower right corner of the window, you can change the left / right and x / y axes, which are responsible for the direction of the analog sticks.
 - The ability to adjust the axes is usually available in every game, so only make changes if you want the setting to be consistent across all games and menu functions.
 8 Adjust the Deadzone parameter. Move the Deadzone slider to the right to widen the area within which the program will ignore input when you move the analog stick, or to the left to narrow it down.
 - The Anti-Deadzone slider can also be used to make the emulator try to bypass the dead zones already implemented in games.
- Each analog joystick has a different deadband setting.
 9 Adjust vibration parameters. Move the slider to the left to decrease the vibration intensity, or to the right to increase it.
 - For this feature to work, use a vibration-enabled gamepad.
- This feature will only generate vibration in games that support it.
 10 Click Restore Defaults (optional). This will reset all parameters to their original values. Since the button bindings cannot be changed, the controller configuration can be completed at this point.
  11 Configure a second input device (optional). Select "Controller 2" in the upper left corner and repeat the previous steps to set up the controller for the second user.
 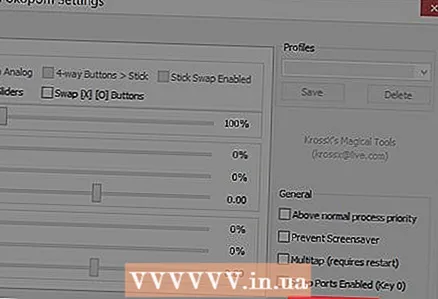 12 Click OK. This will save the controller configurations and close the settings window.
Tips
- Be careful when binding keys with the LilyPad. The emulator allows you to bind several actions to one button / key, and vice versa. If you are wrong it can cause some confusion while playing.
- Xbox controllers have built-in driver support in Windows. This avoids potential compatibility issues while playing on the emulator.
- If you run into problems, make sure your computer meets the system requirements to support the emulator.


