Author:
Peter Berry
Date Of Creation:
18 February 2021
Update Date:
15 May 2024

Content
From using separate accounts for iTunes, currently all Apple services revolve around each Apple ID. The process of creating an Apple ID account is similar to the previous steps to create an iTunes account, only in name. See step 1 below to learn how to create an Apple ID account on a computer or iOS device.
Steps
Method 1 of 3: On the computer
Open iTunes. You can create an Apple ID directly on the iTunes app. Since Apple no longer uses a separate iTunes account, users will have to create an Apple ID and sign in on all of their individual Apple devices.

Click the Store menu. Select "Create Apple ID" from the menu. You need to read and accept the Terms and Conditions first before you can continue.
Fill out the form. Once you accept the term, you will be redirected to a form to fill out account information. You will need to provide a valid email address, password, security question and date of birth.
- If you don't want to receive news from Apple, you can uncheck the boxes at the bottom of the form.
- Note: the email address you provide must be valid, otherwise the account will not be activated.
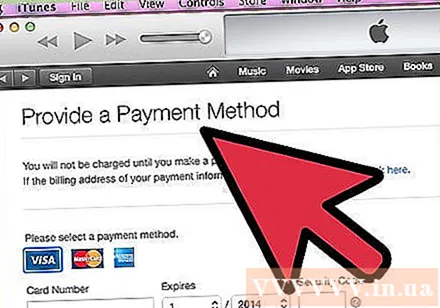
Fill in payment information. You need to enter valid credit card information if you want to make a transaction on iTunes. Even if you don't want to link your credit card to your account, an available form of payment must be provided. After that, we can still delete the credit card information or apply the method mentioned at the end of this article.
Verify your account. Once you complete the form, Apple will send a verification email to the address provided. This email includes a link "Verify Now" with account activation effect. It may take a few minutes for the email to arrive.- On the verification page that opens after you click the link, enter your email address and password in the form just now. This email address will be the new Apple ID account you need to use every time you sign in.
Method 2 of 3: On iPhone, iPad or iPod Touch
Open the Settings app. This app is usually located on the Home screen. Scroll down and tap on the "iTunes & App Stores" option.
Make sure you are logged out. If the device is logged in with an existing Apple ID, you must sign out to create a new account. To proceed, tap on your Apple ID and select "Sign Out".
Click "Create New Apple ID". The account creation process will begin.
Choose your country. Before you get started, you need to select the country in which the account will be used. If you travel a lot, you should choose where you live. Read and accept the Terms and Conditions before proceeding.
Fill out the account creation form. You need to enter a valid email address, password, security question and date of birth.
Fill in payment information. You need to enter valid credit card information if you want to make a transaction on iTunes. Even if you don't want to link your credit card to your account, an available form of payment must be provided. After that, we can still delete the credit card information or apply the method mentioned at the end of this article.
Verify your account. Once you complete the form, Apple will send a verification email to the address provided. This email includes a link "Verify Now" with account activation effect. It may take a few minutes for the email to arrive.
- On the verification page that opens after you click the link, enter your email address and password in the form just now. This email address will be the new Apple ID account you need to use every time you sign in.
Method 3 of 3: Create Apple ID without credit card
Open the App store on your computer or iOS device. We need to download and install any free app first before we can create an account without using credit card information.
Find some free app. You can choose any application for free. Try to find the necessary application that you will need to download firstly. If you don't, just download any app and delete it when you're done.
Install apps. Tap the "Free" button at the top of the app's store page, and you'll be prompted to sign in to your Apple ID.
Click or click "Create Apple ID". When prompted to sign in for your account, choose create new. The account creation process will begin.
Fill out the form. You need to accept the Terms and Conditions first, then the account creation form will appear. Review the methods above to learn how to fill out this form.
Select "None" as the payment option. Under the Payment Method section, you will have the option "None". This is the only way to create an Apple ID without providing credit card information from scratch.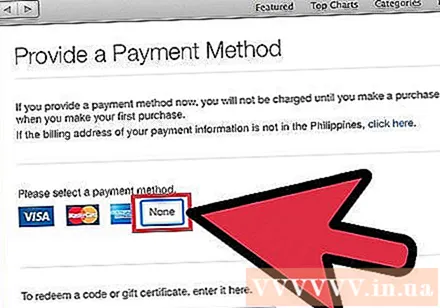
- On your iPhone or iPod Touch, you may need to scroll down to find this method.
Complete the account creation process. Once you complete the form, a confirmation email will be sent to the address on the form. You will need to follow the link in the email to complete the process. advertisement