Author:
John Stephens
Date Of Creation:
27 January 2021
Update Date:
17 May 2024

Content
Photoshop — really powerful enough to be a verb! One of the world's most famous application software is also known to be difficult to learn — but today we will dispel that notion. Despite being born more than 20 years old and increasingly powerful, but the software interface remains simple, reasonable and easy to understand. Today's wikiHow teaches you the basics and how to continue your more advanced learning with Photoshop CS6.
Steps
Method 1 of 4: Basic tools
Open Photoshop. If you don't have Photoshop yet, you can download a free trial version at Adobe.com. Click the button Try It on the right side of the page.You get a 30-day full-featured trial to see if Photoshop is right for you.

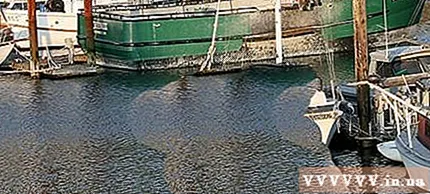
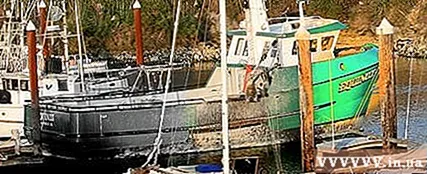
Open the document. Keep key Command and click (Windows: press Ctrl and click) come in to open the sample image in a new tab. You can operate this tutorial in parallel. Drag the photo, drop it onto the desktop, and open it up in Photoshop.- Your screen should then look like this:
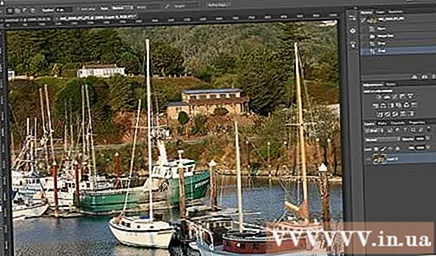
- Your screen should then look like this:
Select Marquee tool (shortcut:M). Click the icon or press the M key (For the rest of the tutorial, the keyboard shortcut will be covered after the tool name.) Marquee is the most basic tool you may be familiar with: almost every application Both applications and operating systems select objects by clicking and dragging to select an area of the screen. So does Photoshop.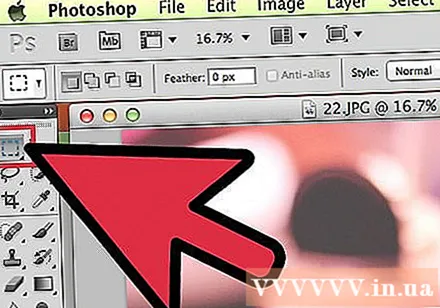
- Click and hold your mouse on the Marquee icon, a menu will pop up with options: Rectangular marquee (default) creates a rectangular selection; Elliptical marquee, make a circular and oval selection; and Single (row / column) marquee to make a selection 1px wide vertically and horizontally.
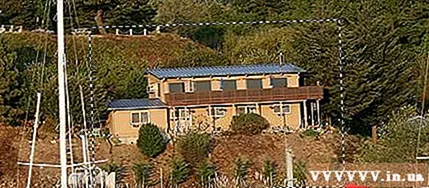
- Now, select the Rectangular marquee, position your mouse pointer somewhere above the left of the image, then click and drag. You should see the selection gradually expand with the pixel values displayed on the right. Drag the mouse to the center until it is approximately W: 300 H: 200 (300 wide by 200 wide), and then release.
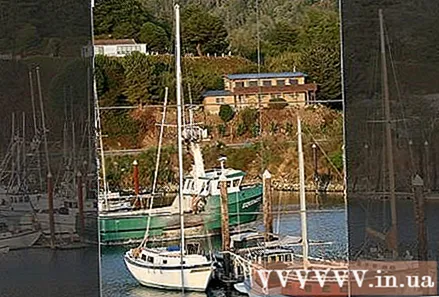
- Click and hold the mouse in the middle of the selection, then move the mouse pointer — the selection will move with. Make a selection around the brown house on the hill like this:
- You can copy, move, apply filters to selections — anything in Photoshop can be done from here.

Select the Lasso tool (L). Similar to Marquee is the Lasso tool, used to create a selection. However, with Lasso, you can make a freehand selection. This group includes the Polygonal Lasso tool (choose according to polygon) and Magnetic Lasso (choose freely). Pick a basic lasso tool and give it a try.
- Click and hold the mouse button and draw a selection around the little white sailboat on the center left in the window. When dragging to the bottom of the boat, release the mouse button — the selection will automatically be completed. Now, press Command-D (Mac) or Control-D (Windows) to deselect. Note, this works for all selection area.
- Press the Shift-L combination. The mouse pointer will change to a tool Polygonal Lasso. (Shifting with keyboard shortcuts cycles through related options). The black arrow mark in the upper left corner is the mouse pointer to the left of the Polygonal Lasso mouse.
- Click once anywhere on the image. Each time you move the mouse, the dashed line extends from the original pinned point toward the mouse pointer. When you click again, that will be the next pinned point. You can keep clicking until the selection is complete: it can be as simple (like a triangle) or as complicated as it should be. When reaching the end point, double click instead of just click, the polygon will be closed automatically.
- Press the Escape key any time you want to cancel the selection.
- Press Shift-L again to switch to tools Magnetic Lasso. As with the lasso tools, the click point is the black marker above, to the left of the mouse pointer.
- Try it: click and hover according to the water level in the nose (in front) of the boat, then gently pull around the object. As you move, the selection follows the mouse pointer that clings to the boat!
- The top of the Photoshop window has a few additional tools: Feather, Anti-alias, Width, Contrast, and Frequency. As for advanced learning, try these options to see each effect for the selection. The "tips" for specific tools or settings will appear as you hover over each interface element.

Select the Quick Selection tool (W). This is an enhanced version of the Magic Wand tool (still exists as an alternative tool).
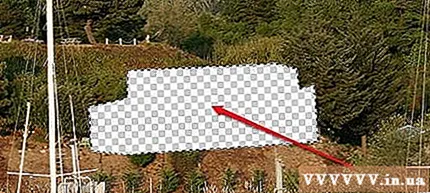
- Try it: click and hold on the brown house in the middle of the picture. While holding, drag left or right to "paint" the house. The selection will be created while you do this. Make sure the entire house is selected and don't miss the roof or balcony. When you release the mouse button, you will see that the bush is also selected:

- There are two ways to remove bushes with the Quick Selection tool. The first way is to choose the Subtract (Subtract) version of the tool.

- To subtract the selection, simply press and hold the Option (Alt) key, the tool will temporarily switch to the excluded version (you will see the additional tool transforming at the top of the screen when you press the key.)
- Another way is to click and drag the mouse gently over the excess bushes, the object will be deselected:

- You can adjust the sensitivity of the selection by resizing. The larger the size, the more you can choose. Click on the standard Quick Selection tool, set the size to 100, then try to select the house again.

- Try it: click and hold on the brown house in the middle of the picture. While holding, drag left or right to "paint" the house. The selection will be created while you do this. Make sure the entire house is selected and don't miss the roof or balcony. When you release the mouse button, you will see that the bush is also selected:
Select the Crop crop tool (C). According to Adobe, this is the most used tool in Photoshop. It's one of those tools that can crop anything and dramatically improve the composition of your photos. When selecting the Crop tool, you will see a small handle in the corners and on the border right in the center of the image: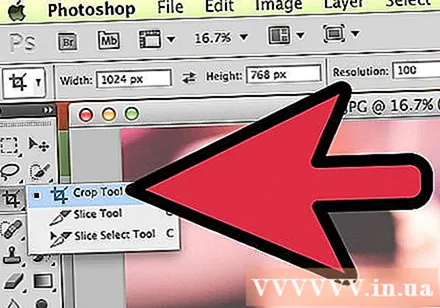
- To crop the image, you can drag the handle around the part of the image you want to keep, or click and drag inside the image to draw the crop area. As you do this, the image area remains normal, and the cropped area will be blurred. Make a selection similar to the one in the image, and then press Enter:
- Notice how the overall center of the photo changes. Click Undo (Command-Z, Mac, or Control-Z, PC) to return the image to its original size. If you have gone through a lot of changes, you can revert to based on your editing history using Command-Option-Z (Control-Alt-Z).
- Perspective crop. Instead of cropping in a simple rectangle, Perspective Crop allows you to adjust the proportional angle of the image when cropping. The tool is incredibly powerful, fun, and rewarding, but it's an advanced feature that needs to be described in more detail in more in-depth tutorials.
- The Slice tool, part of the Crop menu, is designed to divide images into web pages. Like the Perspective crop, this is an advanced feature that needs to be covered in detail in the appropriate tutorials.
- To crop the image, you can drag the handle around the part of the image you want to keep, or click and drag inside the image to draw the crop area. As you do this, the image area remains normal, and the cropped area will be blurred. Make a selection similar to the one in the image, and then press Enter:
Select the Text tool (T). It is often said that an image is more than a thousand words, but sometimes an image is not enough: you need the word on it too! Photoshop's text tool gives you a few options.
- After selecting the Text tool, click near the bottom left of the image. You should see a blinking text insertion pointer. Please type "Boats in the Bay". Depending on your setup, the text can be very loud, very small, or display in hard to read colors. The text properties editor is at the top of the Photoshop window:

- Font family. Like all font menus this menu allows you to choose the font you want. You can choose from the list, or type the font name. The font name will automatically fill in as you type. To match the tutorial, choose the font Helvetica.
- Font style. Related font styles (if any) for the font group (such as Bold, Italic, Light, Medium, etc.), will appear in this pop-up menu. If the menu is grayed out, there are no customizations for the current font group. In this example, choose "Regular".
- Font size. Option to adjust the font size. You can enter text according to a specific font size, or choose a size from a small list. To change the font size quickly, flexibly and easily, click and hold your mouse on the T icon located to the left of the field, then drag to the left or right: the size will change significantly.
- Antialiasing. Option that determines the smoothness of the image margin. If anti-aliasing is turned off, the text displays as 1984's typeface: like stairs. Here are the differences between the antialiasing settings:

- Justification. The icon says it all: the option aligns all text on the selected layer left, center, or right.
- Color. This color box defaults to the foreground color when you first select the Text tool. To change the text color, you select the text layer itself, the Text pointer or any part of the text in the field.Click the color box, choose a color, any text selected along with all future text will show up under this new color. Note: if you select a multicolored text field, the colored box will display a question mark (?). All other text properties will appear as blank cells.
- Warp. This option warps, or "distorts" the text vertically or horizontally. To use it, just select the text layer, click the Warp button and work with the Style and the sliders until you like it. In this article, we will use the Flag style and set the bend slider to 100%.

- Panels. The Panels button opens two more panels: Character and Paragraph for you to fine-tune the look of your text.
- After selecting the Text tool, click near the bottom left of the image. You should see a blinking text insertion pointer. Please type "Boats in the Bay". Depending on your setup, the text can be very loud, very small, or display in hard to read colors. The text properties editor is at the top of the Photoshop window:
Create arbitrary size text fields. Click and drag the mouse from the upper left corner where you want the text box to appear in the lower right corner of the frame. You should see a rectangle with handles in the corners and edges appear on the screen.
- Type a few sentences into the box. Don't worry if the text is too big or too small. When you're done typing, press Enter. If the text is too small, you can use the Font Size adjustment box (top) to make the text larger. Conversely, if the text is too big, use the Font Size adjustment box to make the text smaller.
- You can adjust the size of the text area: hover the mouse pointer over the handle for a few seconds, the mouse pointer will turn into a double arrow mark. Click and drag the mouse to adjust the frame size: the text will curl within the frame.
Close the window. Save the file or remove any desired changes. Besides, you always still have an unmodified version. advertisement
Method 2 of 4: Drawing tool
Create new documents. In the New dialog box, set the Width to 1024 pixels, the Height to 768 pixels, and background contents to white (white).
Select the Brush Tool (B). This is a part of Photoshop from before version 1.0 that almost every drawing application has!
- The Brush menu includes the Pencil, Color Replace, and Mixer Brush tools.
- The Pencil tool draws lines of different thicknesses, although you can use different brush tips, the Pencil tool doesn't have anti-aliasing properties: you will see pixels clearly.
- The Color Replacement tool is very useful for replacing one color (or range of colors) with another color.
- The Mixer Brush will blend different colors together, as well as how the artist mixes colors on the palette.
- Choose a color for the brush. Click the Foreground Color box at the bottom of the tools list. The color picker dialog box will appear. Please choose any color that suits you. For this tutorial, we will choose the color red. When you have selected your favorite color, click OK to close the window.

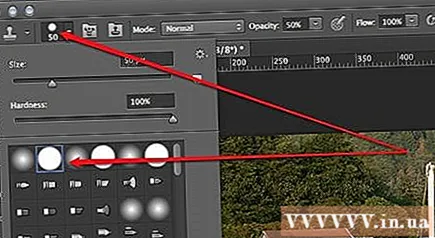
- Choose a brush. The easiest way to select a brush is to click on the brush menu in the upper left of the Photoshop window. Choose any brush tip. Remember to note the Size and Hardness parameters. Size sets the diameter of the brush tip, while the Hardness is for the outline: 100% brushes have hard edges, while 0% brushes have soft edges. Set the Brush Size to 30 and Hardness to 50%. You can use the slider, or enter the correct number.

- Try doodling with your chosen color to see how the brush works. You can also adjust the Opacity and Flow options on top. Opacity sets the opacity of the color while Flow determines the amount of ink color in each brush stroke on the artboard.

- To see the difference between Opacity and Flow, set the Opacity to 50%, then doodle without dropping or clicking. If you choose red, you will see a small pink spot. If you release the mouse button and start doodling again, you will see the new stroke overlap the old and darker one. The color will be lighter at the start of the new stroke. Transparency is added to each stroke, not throughout a single stroke. Now return the Opacity to 100%.
- Set the Flow to 25% and the Opacity to 100% and then scribble again. When examining the brush stroke, you will see that the color darkens until it becomes red. Transparency quickly reaches 100% from the start. With a Flow rate of 100%, the whole color will be drawn onto the draft immediately.
- When the experience is finished, clean up the drawing by pressing Command-Delete (Control-Delete). The painting will be filled with background color. If you press Option-Delete (Alt-Delete) the drawing will be filled with foreground color.
- The Brush menu includes the Pencil, Color Replace, and Mixer Brush tools.
Select the Shape Tool (U). By default, the Rectangle tool will be selected. Click open the Shape menu and choose the Polygon tool. You will be able to specify the number of edges and draw the desired shape automatically.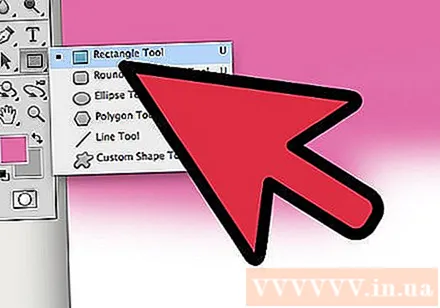
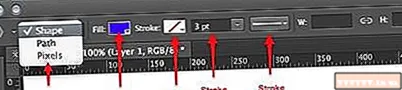
- Note the settings along the top of the screen. The Shape menu (shown below) allows you to choose between Shape, Path or Pixels. The shape will help you create a complete shape (something you can do with the Pen tool). The fill color is on the Fill menu; the outer stroke color (if any) is on the Stroke menu; the stroke width is set in the stroke width menu; and the line options — dashed lines, solid lines, and so on — are set on the Stroke Options menu.
- Another option to look out for in the Polygon tool is Sides. Options allow you to specify the number of sides of a polygon — from 3 to 100. You can enter numbers directly, or click and hold on the word Sides, and then drag left or right to increase or decrease the number of edges.

- To create a polygon, click and drag anywhere on the artboard. The polygon will open from the center of the mouse click. Before releasing the mouse, you should see something like this:

- When you release the mouse button, the polygon will be filled with the color you have selected, and the outline will carry the stroke properties you have set.
- Or, to make polygon quicker and easier, just click once anywhere on the artboard. A dialog box will appear allowing you to set all the parameters at once. Here is an example and next to the result:

- Note the settings along the top of the screen. The Shape menu (shown below) allows you to choose between Shape, Path or Pixels. The shape will help you create a complete shape (something you can do with the Pen tool). The fill color is on the Fill menu; the outer stroke color (if any) is on the Stroke menu; the stroke width is set in the stroke width menu; and the line options — dashed lines, solid lines, and so on — are set on the Stroke Options menu.
Select the Paint Bucket Tool (G). Because this is the second tool in this menu, you need to click on the palette icon, then select the Paint Bucket bucket as shown: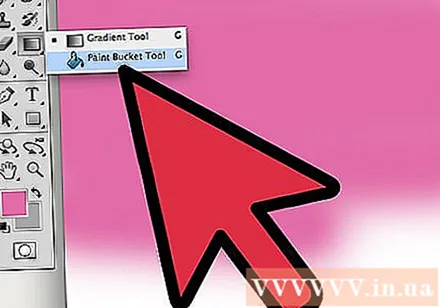
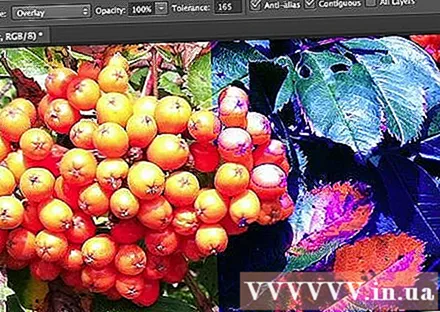
- This tool is really familiar: it is present in nearly every drawing application on earth. The selection will be filled with the color of your choice. While most applications require filling selected areas with pure color, Photoshop allows you to customize the tolerances so that any color points that fall within the range of the original click position will be filled. For example, to the right of this image is filled with blue, the Overlay and Tolerance modes set to 165:
- Press D to select the default Foreground and Background colors, then press Command (Control) -Delete to delete the drawing and fill it with white.
- This tool is really familiar: it is present in nearly every drawing application on earth. The selection will be filled with the color of your choice. While most applications require filling selected areas with pure color, Photoshop allows you to customize the tolerances so that any color points that fall within the range of the original click position will be filled. For example, to the right of this image is filled with blue, the Overlay and Tolerance modes set to 165:
Pick the Gradient Tool (G). If you have the Paint Bucket or 3D Material Drop tool selected, you can press Shift-G until the Gradient tool is selected. The Gradient tool allows you to fill an area with two or more smoothly blended color scales.
- At the top of the window, double-click the palette and select the blue, red, and yellow scales in the first row, on the right.

- Click and hold the mouse from the upper left corner, drag to the lower right corner, the drawing will look like this:

- As with the Paint Bucket tool, you can apply a color scale with different color overlays to images. Experiment with each color scale and see how they affect the color blend.
- To edit a color scale, click the color scheme. The Gradient Editor dialog box will appear. Click the colored cards to choose the colors for each point, then move the points to set the starting and ending points for each color. Click on the black tabs at the top to specify an opacity.

- Close the Gradient Editor.
- At the top of the window, double-click the palette and select the blue, red, and yellow scales in the first row, on the right.
Method 3 of 4: Editing tools
- Return the model. Open the sample file SamplePic.webp. "After you have done the above instructions and saved your changes, you should have some text fields. Under the Layers tab on the right (if you don't see it, select Layers from the menu Windows), click the eyeball icon representing all layers except the actual photo layer. After deselecting the text layer, click to activate the image layer.

Select the Clone Stamp tool (S). The Clone stamp allows you to select one part of the image and copy it to another.
- Choose a brush. At the top of the window, to the right of the Clone Stamp icon, is the brush panel. Click on it and select the brush tip as shown below.
- Use the Size slider and set the brush tip to 50.
- Set up your mirror source. Before copying the image, you need to select the content to be sampled.We'll hide the white boat in the middle of the image with water. Hold down the Option key (Alt) and click on the position where the water texture changes as the red target in the image:

- At this point, the cursor position will be the source image. Move the mouse pointer to the white boat and match the ripples in the water as dense as possible. It may not be perfect, but it will be almost real. The mouse pointer and arrangement should look like this (enlarged image):

- Click and hold the mouse button and paint on the boat as much as you can. You will see repeating patterns, but next we will show you how to minimize this. Once you've smeared the boat off, your screen will look like this:
- Soften the edge of the copy area. Click again on the brush panel at the top, reducing the Hardness to 0%. The outline of the object will be faded out gradually. Select the duplicated source that is almost identical to the original, then paint over the edges of the duplicated area. Click on different parts of water to minimize sample duplication. When done, you should get the following image:

- If you want a real challenge, try clearing the mast. Use the smaller brush tip and duplicate the resources close to this mast.
- Also on the Clone Stamp menu is the Pattern Stamp. This tool also paints on the image like the Clone Stamp, but instead of using part of the image, the Pattern Stamp uses the existing pattern.
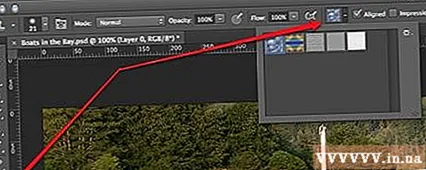
- To create your own drawing pattern, select a part of the image using the rectangular Marquee tool, then click on the menu Edit and choose Define Pattern ... (Shaping pattern). Give the new pattern a name, select the Pattern Stamp tool and click on the Pattern Pattern panel (see image below). Draw on the photo and the pattern will be "pasted" on top:

- If you check the box "Aligned", even if the brush stroke goes through many times, the pattern will be arranged evenly like a chess board.
- If the "Aligned" box is unchecked, the pattern will be generated after each click and will look more natural.
- If you check the "Impressionist" box you will get random colored dots from the sample. Color dot size is determined by brush tip size.
- Choose a brush. At the top of the window, to the right of the Clone Stamp icon, is the brush panel. Click on it and select the brush tip as shown below.
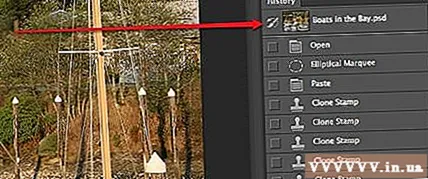
Pick the History Brush tool (Y). Unlike archiving copies parallel to the process, then just reopening them, the History Brush will take you back to earlier versions of the image and allow painting to be drawn on those versions.
- Scroll to the top of the History tab. If you don't see this tag, select History from the menu window. The top of the History window has a small image of the image. Check the box next to the thumbnail: this is the version we will draw on.
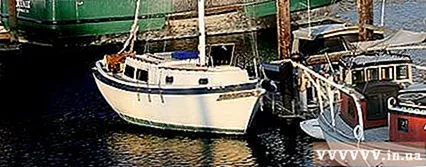
- The white sailboat that you just cloned to cover is gone? But we will bring it back! After choosing the History Brush, use the Brush palette to choose a brush tip size of 100, 100% hardness.
- Click and hold the mouse in the original position of the boat and start painting. The boat will gradually appear!

- Use the History Brush to paint the image back to its original appearance.
- Scroll to the top of the History tab. If you don't see this tag, select History from the menu window. The top of the History window has a small image of the image. Check the box next to the thumbnail: this is the version we will draw on.
Select the Spot Healing Brush tool (J). Similar to the Clone Stamp, the Spot Healing Brush will overlap the image with a different part of the image. However, in this case, the tool will sample the area of the image that is adjacent to the click (so it is often used for concealer). You will get unexpected natural results.
- With the Spot Healing Brush tool, choose a round brush tip, 50 pixels in size and 50% hardness.
- Locate the brown house on the hill, in the middle of the photo. Start from the right side of the house, click and drag from the tree branch onto the house. You will see the house disappear under the pine tree!

- Continue painting on the house until it disappears. You can refine the border to make the hillside look more natural. When it's done, your photo should look something like this:

Select the Dodge tool (O). Lightening and darkening date back to the day photographers were working in dark rooms. Overlay (Dodge) parts of the image that blocked light from reaching the image, making the covered area visible; And Burn, or pass more light, will darken the burnt area! These two tools use similar.
- After choosing the Dodge tool, set the brush tip size to 50 and the Hardness to 50%. To the right of the brush panel, set the Range to "Highlights" and the Exposure to 50%.
- We'll add some light on the bottom right of the boat. Draw on the boat, near the word "The Saint." This boat network will gradually light up. Likewise, notice that if you skip and paint over the wooden deck, there is not much change: we only selectively lightened on white tones. But a little bit of sunlight hitting the rear of the cabin will make the image significantly more vivid.

- Switch to the Burn tool by pressing Shift-O. You can keep the brush selection and the Exposure setting the same, but change the Range to Shadows. Paint the water around the boat. You will see the water gradually darkening, and the sunny boat will remain unaffected. By using the Dodge and Burn tools wisely, you can really make the image stand out.
- Switch to the Sponge tool by pressing Shift-O. The Sponge tool allows you to desaturate (remove colors), or saturate the image (enrich the colors) selectively. Select the Sponge tool, set the Mode (the first mode is "Desaturate." Desaturate the back of the boat until completely black and white. After that, switch to Mode "Saturate." The color will be richer at first, but it will quickly become animated in the future. Don't edit the center of the boat for easy comparison.
Method 4 of 4: Advanced Tools
Select the Pen Tool (P). The pen tool is great for making clear, editable selections. It is a difficult tool and takes a lot of practice to master, but it is well worth it. Click to select the icon, or press P. Your mouse pointer will turn into the stylus tip.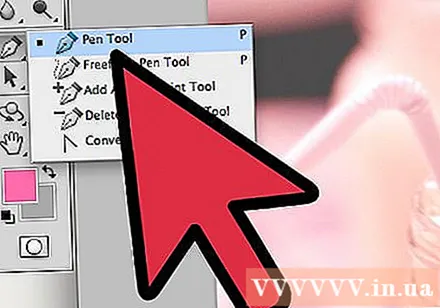
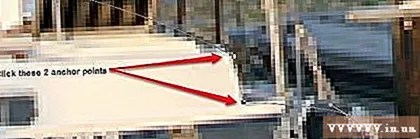
- Return to the white boat on the center left, click on the bow, where the hull is in contact with the water and drag along the water line back to the center of the boat. You should see the handles from the original click position — this is the anchor point — extending into a straight line. When you reach the center of the hull, release the mouse button.

- Note that the handle remains in place. Now, click and hold your mouse on the stern (back) of the ship right in the waterline, and drag up to the middle of the back of the ship. Don't release the mouse button yet at this point.
- You will see that the original handles will disappear, replaced by a new line extending from the second anchor point. You will also see an arc extending from the water to the original anchor point and up above the second anchor point.

- If you move the handle below the mouse pointer around the second anchor point, you will see the line flexing like an elastic. Don't worry if this line breaks into the boat for a moment — we'll correct it now. As shown below, complete the anchor points around the hull, finally click the initial anchor point to close the loop:

- The outline around the ship will likely resemble the image below, only loosely connected to the boat. Now we'll fix it with the Direct Selection tool.
- Return to the white boat on the center left, click on the bow, where the hull is in contact with the water and drag along the water line back to the center of the boat. You should see the handles from the original click position — this is the anchor point — extending into a straight line. When you reach the center of the hull, release the mouse button.
Pick the Direct Selection tool (A). Make sure the mouse pointer is White not black. If the cursor is black, press Shift-A, or use the Selection tool to select the Direct Selection tool.
- Click on the first anchor point. The handle will appear as below. Click the rightmost handle and sway the mouse: note that the left and right handles will move together around the anchor point. Now, press Command-Option (Control-Alt), click on the rightmost handle and drag upwards.

- You will find that only the right handle moves, the contour between the top anchor point of the bow and the point you are editing at least starts to get close to the hull. Pull the handle to the center of the hull and release the mouse.
- Click on the bottom anchor point of the stern. When you see the handles, click on the right handle and flick it upwards. You should see the contour begin to match the water line. Adjust that handle and the handle to the left of the first anchor point until the contour almost coincides with the water line.
- You may have to align the anchor points yourself — click and drag them, or click the anchor points and use the arrow pointer to move them in any direction.When finished, the contour at the bottom should look like this:

- Tweak around the boat to make the line as close to the hull as possible. It's okay not to make a perfect selection — it's important that you get a feel for how to use the anchor points and handles. You can stop when the result is like this:

- There will be times when you don't want soft, rounded corners, so we need to remove the handles to increase the edge. The front edge of the cabin is such a place. Locate the anchor point you place here, then hold down Command-Option (Control-Alt), click on the anchor point and the point below it. You should see the handles disappear, and the line between the two points will be straight, not curved.
- After adjusting the handles, right-click the contour and select Make a Selection (Make selection) from the menu. Click OK in the dialog box that appears. The boat has been chosen. If you want to edit the selection, you can proceed in the window Paths. Press Command-D (Control-D) to delete the current selection, click the path tab (Work Path), make sure the Direct Selection tool is selected and edit! Once done, you will have a new selection.

- Note: If you want to save this path for later use, double-click on the word Work Path, name and press Enter. The path is now saved in your document.
- Click on the first anchor point. The handle will appear as below. Click the rightmost handle and sway the mouse: note that the left and right handles will move together around the anchor point. Now, press Command-Option (Control-Alt), click on the rightmost handle and drag upwards.


