Author:
Randy Alexander
Date Of Creation:
1 April 2021
Update Date:
14 May 2024

Content
The delicate lace veins are often used to decorate scrapbooks, collages and other crafts. Leaf veins can be quite expensive to buy, but you can easily make your own at home. Not only will you save money, but you can also bleach or dye as you desire. Best of all, you can choose the shape and size of the leaves to your liking!
Steps
Part 1 of 4: Use washing soda (sodium carbonate).
Place the selected leaves in the pot. It is up to you to make as many leaves as you want, but don't put too many leaves in one pot. You should make at most a layer of leaves covering the bottom of the pot. The leaves best suited for veins should have a smooth and waxy appearance, such as magnolia leaves or gardenias.
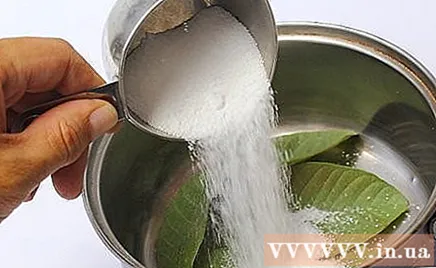
Fill the leaves with water and washing soda. You need ½ - ¾ cup (70 - 100 g) of washing soda and 4 cups (1 liter) of water. Gently stir the solution to dissolve.- Don't use baking soda; These two are not the same.
- Washing soda is also called "sodium carbonate." You can find washing soda in the laundry soap section of the supermarket.

Heat until the leaves are tender. Turn to medium or medium heat to boil the water, then reduce to simmer until the leaves are tender. The cooking time will take from 90 minutes to 2 hours, depending on the type of leaves.- The water will evaporate while simmering. If necessary, add more water to the pot to prevent the leaves from drying out.

Get the leaves out of the water. Put on plastic gloves or rubber gloves first, then use tongs to remove the leaves from the pot. If the leaves are soft and sticky, soak them in a basin of cool or cool water for a few minutes; This will make it easier to rinse off afterwards.
Place the leaves on a tissue and gently scrape off the pulp. Use tweezers to hold the stem and use a brush or a soft toothbrush to brush off the pulp. Turn the leaves over and scrape off the other side.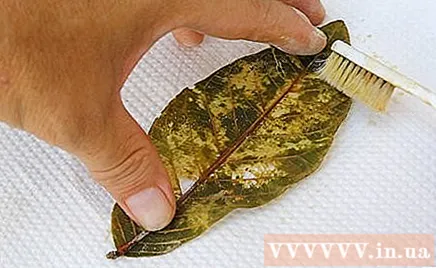
- It is even better to shave when you soak the leaves in cool or cold water.
- Be very gentle when performing this step; the leaves will tear easily.
Wash the leaves in clean water at least once. The leaves will be very fragile at this point, so be gentle. Fill a pot with cool or cold water and drop the leaves. Stir gently if necessary. If there is still anything sticking to the leaves, change the water and repeat this step.
- Do not wash the leaves under running water; the force of the water current will damage the leaves.
Let the leaves dry. Pinch the leaves between two sheets of tissue, then hold some heavy books on top. The paper towel will absorb the moisture, while the book will help flatten the leaves. If you don't, the leaf may curl and curl.
- If you want the leaf to curl or curl (naturally), leave the leaf on a tissue to dry without blocking anything on top. Since there is no weight, the leaves will naturally curl as they dry.
Part 2 of 4: Try other methods
Soak the leaves in water instead of simmering. Boil 2 cups (500 ml) of water with 3 tablespoons (26 g) of washing soda. Remove the pot from the stove and let the leaves soak for 20-30 minutes. Take the leaves out after soaking and scrape off the pulp as above.
- The procedure is similar to the above method, except without heating the leaves continuously.
- This method is suitable when you are making small batches or using foil.
Soak the leaves in white water if you are patient enough. This will take about 2-3 weeks, and you will need to change the water every few days to prevent the water from staining. You can add a little bleach to the water to prevent it from rotting. Use a toothbrush to shave off the leafy pulp when it has been soaked for enough time.
- If you plan to add bleach, mix 1 part water to 30 parts bleach.
Try bio-detergent. Mix 2 cups (500 ml) of water with 120 g of bio-detergent. Add the leaves and boil for 30 minutes. Rinse the leaves, then scrape off the pulp with a soft toothbrush. Squeeze the leaves between blotting sheets for 2 weeks. advertisement
Part 3 of 4: Color staining or bleaching of leaves
Use bleach to turn the veins white. Pour 1 cup (250 ml) of water and ¼ cup (60 ml) of bleach into a basin. Add the leaves and soak until the leaves are bleached. The soaking time is usually 20 minutes, but it can take longer if the leaves are darker or thicker.
- If you have multiple veins, you may need to do several batches during this step. Do not fill the pot with many leaves when soaking the bleach.
Wash the leaves in clean water. Fill the basin with clean cool to lukewarm water. Dip each leaf in water one by one, then place it on a paper towel. The water will remove the remaining bleach and terminate the bleaching process.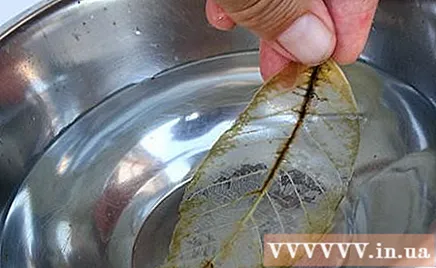
Wait for the leaves to dry. If you want the leaf to be flat when it dries, hold the leaf between two sheets of paper towels, then block a few heavy books on top. If you prefer a more natural-looking leaf, leave it on a tissue without blocking anything. If there is no weight, the leaves will curl and curl slightly after drying.
- This usually takes about 20 minutes.
Soak the leaves in food coloring or watercolors to create color. Mix water with enough food color or water color for the desired shade. Soak leaves for up to 20 minutes in solution and remove. Wash the leaves with clean water, then allow to dry using the same method:
- If you want the leaf to be flat, sandwich it between two sheets of paper, then hold the book up.
- If you want more natural leaves, let the leaves dry on a tissue.
Paint watercolor or food coloring on the leaves. Pour the color you want to paint into a small cup or lid. Use a soft brush to paint the leaves. You can paint evenly or paint each strip of color to create an ombre effect. Let the leaves dry between the two books when coloring is complete.
- Avoid using a bristle brush, as it can damage the veins.
Spray paint over the leaves if you want a metallic effect. Place the leaf on the paper towel and spray it in a layer thin Paint spray metallic on leaves. Use tweezers to lift the leaves over a clean paper towel and allow to dry. Repeat with the back of the leaf.
- Do not leave the leaf on the paper towel sprayed, or it will get on the paper towel.
- It's even better to use spray paint to make fake flowers.
Part 4 of 4: Decorating or using veins
Add some shine to the veins with beads, glitter, or sparkling stones. Spread the liquid glue around the leaf and / or the leaf stalk in the middle, then sprinkle fine glitter on the leaves. You can replace glitter with glass beads or tiny shiny stones. You can also draw glittering glitter patterns on the leaves.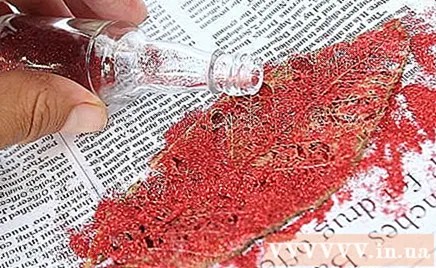
- Small-tip manual glues or glues work best. You can also use a thin, sharp brush to apply the glue.
- Don't use regular glitter, as it is too heavy for the veins.
Use dried leaf veins as a bowl or box. Wrap a bowl or box with plastic wrap. Mix equal parts milk glue and warm water. Dip the leaves in the glue and sprinkle them in a bowl or box. Wait to dry, then remove the leaves; Peel off the food wrap that has stuck to the leaves.
- Sprinkle with a bit of fine glitter for a sparkle effect.
- If you don't have milk glue, you can try using a handmade glue or a decorative glue (such as Mod Podge).
Use leaf veins to decorate scrapbooks and cards. You can use a dry glue stick to glue the veins to cards and scrapbooks or apply a layer of liquid glue to the back of the leaves to paste.
- For an extra cool look, you can use a shaping puncher or a hand-cut knife to create interesting shapes (such as hearts, stars, moons, etc.) in the center of the leaves.
- You can also use leaves as prints. Paint the leaf with water color, press the leaf against the paper, and peel it off.
Place the veins on a candle or glass vase. Wipe the glass object with rubbing alcohol first, then apply a decorative adhesive (eg Mod Podge). Spread a thin layer of decorative adhesive onto the back of the veins, then stick to the glass object. Cover the foil with one final layer of glue.

Hang the veins on the wreath. Thread the veins through the junction of the stalk between the leaf and the base of the leaf. You can even make multiple wreaths and hang them vertically to form the backdrop. The string should be thin enough to be threaded through the veins. Fragile leaves may need to be threaded with thick thread or cotton thread. For thicker leaves, you can use thick thread, cotton thread, thick braid, thin nylon thread or thin jute rope.- If you want to keep the veins in place on the string, tie a small knot on both sides of the leaf.
Advice
- The most suitable leaves for this project are: gardenia, holly, hosta, laurel, magnolia, maple, oak, and rubber tree leaves.
- Don't rush in the process of scraping leaves.
- You don't have to shave the entire leaf thoroughly. The half-shaved leaf is also very unique.
- If you don't have liquid or watercolors, you can try liquid dyes, including fake flower dyes. You can even use a colored drink powder!
- If you want to make the veins light, you will have to bleach first to make the color more beautiful.
- This process can evaporate intensely. Remember to leave the windows open or turn on the exhaust fan.
- You can make your own washing soda by baking baking soda in the oven at 205 to 233 ° C. Spread a thin layer of baking soda over the baking sheet. Bake for one hour, stir once when it's been done half the time. When the baking soda turns granular it is okay.
- Be sure to use a soft toothbrush for sensitive gums or a baby toothbrush. Conventional toothbrushes are too hard.
Warning
- Washing soda is a caustic. Remember to wear protective gloves when working.
- Children should not exercise without adult supervision.
What you need
- Leaves (glossy and waxy look is fine)
- ½ - ¾ cup (70 - 105 g) washing soda (Not baking soda)
- 4 cups (1 liter) of water
- Pot
- Latex or rubber gloves
- Tongs or powders
- Tweezers
- Tissue
- Brush or soft toothbrush
- Bleach or food coloring (optional)


