Author:
Charles Brown
Date Of Creation:
3 February 2021
Update Date:
15 May 2024

Content
- To step
- Part 1 of 6: Choosing ingredients
- Part 2 of 6: Different types of mash
- Part 3 of 6: Fermenting
- Part 4 of 6: Choosing a still
- Part 5 of 6: Distilling
- Part 6 of 6: Final steps
- Tips
- Warnings
Vodka is a bland spirit with no specific character, aroma, taste or color. These properties are developed during the distillation process or by treating crude spirits with activated carbon or other materials. Well-distilled vodka can also be further purified and refined by treating it with activated charcoal and other materials. Vodka is normally not aged and can be made from grains, potatoes, sugars, fruits and just about any other product that can be fermented into alcohol. This makes vodka an economical spirits that can be made simply and quickly from readily available materials.
To step
Part 1 of 6: Choosing ingredients
 Choose the ingredients you want to ferment into vodka. Vodka is normally made from wheat, rye, barley, corn or potatoes. You can also use sugar and molasses, either as the main ingredient or in conjunction with other ingredients. There is even a distiller who makes an innovative vodka from red Pinot Noir wine. Whatever you choose, it must contain sugars or starches. This is necessary to produce alcohol. Yeast eats sugars or starches and then emits alcohol and carbon dioxide.
 - When making vodka from grains or potatoes, you need to make a mash that contains active enzymes that break down the starch from the grains or potatoes and convert it into sugars that can be fermented.
- Fruit juice already contains sugars so if you use this, you don't need enzymes that break down starch. If you make vodka from sugars, you only need to ferment it, just like with vodka from fruit juice, so you don't have to make a mash.
- If you make vodka from a drink that has already been fermented, such as wine, you can immediately distill it and turn it into vodka.
 Make sure you have enough of all the ingredients for your mash. If you've decided to use only potatoes for your vodka, for example, they'll need a little extra help converting their starches into sugars. That's what the enzymes are for. Use this table to see if you need to add extra enzymes to your mash to convert starches into sugars:
 Ingredients you will need to make your mash Ingredients Needs enzymes? Additions Cereals and potatoes Yes. Cereals and potatoes are sources of starch, not sugars. Enzymes are therefore necessary to convert the starch into sugars. Malted grains such as malted barley and malted wheat No. Malted grains naturally contain a lot of enzymes that convert the starch into sugars that can be fermented. The enzymes in malted grains are activated when the grain bursts and is briefly exposed to warm water. Ground and malted grains can be used alone, as they contain starch, or you can add them to a starchy but low-enzyme mash. Choose malted grains that are rich in enzymes, such as malted wheat. Refined sugar and molasses No. These naturally already contain sugars and therefore the yeast does not need additional enzymes. You can make vodka from just sugar or you can add sugar to starchy mash to make it more fermentable. 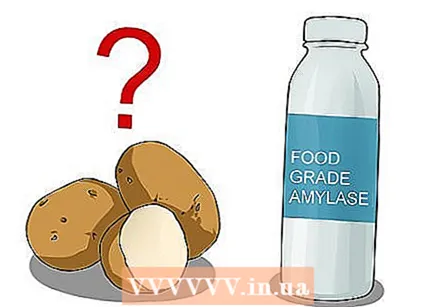 Check if your mash's ingredients need additional enzymes. You can buy amylase enzyme powder that is suitable for consumption on the internet or perhaps in specialized stores. Add this powder to your mash to convert starch into sugars if you use potatoes, for example. Use the amount recommended for the amount of starch to be converted. You don't need to use malted, enzyme-rich grains such as malted barley when using enzyme powder.
 - In order for the enzymes to convert starch into sugars, including starch from malted, enzyme-rich grain, the starch must first be gelatinised. Flocked grains are often already gelatinised. Ingredients that have not been gelatinised, such as potatoes and non-flaked or malted grains, must be heated in water until they reach the temperature at which the starch is gelatinized. Potatoes usually gel at around 66 ° C and barley and wheat usually gel at around the same temperature. So a mash of potatoes only needs to be heated to 66 ° C. If you heat the potatoes to a low temperature, they should be shredded very finely before putting them in the water.
- Enzymes that convert starch only work at very specific temperatures and are destroyed when they get too hot. 66 ° C is a good temperature but if they are heated above 70 ° C they will be destroyed. The absolute maximum temperature they can handle is 74 ° C; in this temperature the enzymes will do their work for a while and so you can also heat your mash to this temperature, but most of the enzymes will be destroyed.
Part 2 of 6: Different types of mash
 Try a wheat bran. In a 38-liter pot with a lid, heat 23 liters of water to 74 ° C. Add 7.6 kilograms of dry flaked wheat and stir. Check the temperature and keep it between 66 ° C and 68 ° C. Now stir in 3.8 kilograms of crushed and malted wheat. The temperature should now be about 65 °. Now put the lid on the jar and let the mixture rest for 90 minutes, stirring occasionally. During these 90 minutes the starch is converted into sugars and the mixture should become a lot less thick and viscous. After 90 minutes to 2 hours, allow the mixture to cool to a temperature of 27 ° C to 29 ° C. Leave it overnight and cool slowly, but do not let it fall too far below 27 ° C.
 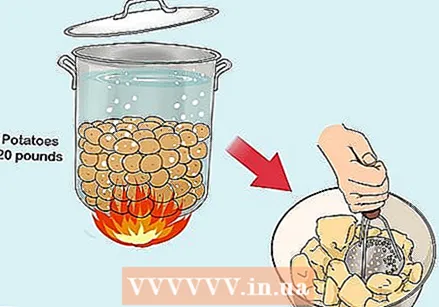 Try a potato mash. Clean 9 kilograms of potatoes. Cook them with their skins in a large saucepan for about an hour until gelatinized. Discard the water and mash the potatoes well with a pestle or in a food processor. Return the mashed potatoes to the pan and add 19 to 22 liters of water. Stir well until you get an emulsion and heat it to about 66 ° C. Add 1 kilogram of crushed and malted barley or wheat to the mixture and stir well. Put the lid on the pan and let it stand for about 2 hours. Stir it every now and then. Let it cool down overnight to between 27 ° C and 29 ° C.
 - If you let your mash cool slowly, you also give the enzymes from the malted barley more time to break down the potato starch.
 Try a corn mash. Make a mash as you did for the wheat mash recipe, but replace the wheat with flaked, gelatinized corn. You can also germinate your corn and then you don't have to add malted grain to your mash. There should be a carrot of about 5 cm from each grain of corn. The germinated corn contains enzymes formed during the germination process.
Part 3 of 6: Fermenting
 Clean all your supplies and prepare your workplace. Fermentation takes place in clean and sanitized vats that are sometimes open, but usually sealed airtight so that there is no risk of contamination. Fermentation usually takes about three to five days.
 - Fermentation can also be done in barrels that have not been cleaned or disinfected and the result will also be drinkable alcohol, but as there may still be bacteria or yeast residues in the barrels, undesirable flavors or a higher amount of alcohol may develop during fermentation.
- There are special cleaning products for sale on the internet such as B-Brite and the disinfectant iodophor. You can buy these to clean your barrels.
 Choose and install your water seal. A water seal is a mechanism that allows CO² to escape without O² being able to re-enter it. A 19-liter mash that you have drained can be fermented in a bucket with a capacity of 28 liters or in a fermentation bottle with a capacity of 23 liters. A bucket must have a lid attached and there are special caps for fermentation bottles, but you should never completely close the bottle or bucket as the pressure built up by the carbon dioxide can cause the bottle or bucket to explode. That's why you need to attach a water seal to the lid or cap.
 - If you let your mixture ferment in an open bucket or container, put a cheesecloth over the bucket to keep insects or other unwanted items from falling into it.
 Drain your mash into the bucket or bottle you will be fermenting in. If you made a slurry, use a fine sieve to drain all of the liquid from your slurry and drain that liquid into your well-cleaned bottle or bucket. Try to let the liquid splash in well and pour it in from as high as possible. This way a lot of oxygen gets into the liquid. In the beginning, yeast needs oxygen to grow and ferment properly. This is because yeast makes cellular material in the form of lipids from oxygen. But after the yeast has passed this growth phase, no more oxygen should be added. Yeast makes alcohol when there is no oxygen present.
 - You can as an alternative also let your mash ferment without letting it drain first. But if you do this, you have to get some air into the slurry in a different way. For example, you can use an oxygen pump from an aquarium or an oxygen stone. You should also drain some of the liquid from the mash first. It is also easier to ferment the smaller amount of slurry left over after pouring, as the slurry may overflow from the bottle or bucket during fermentation.
- If you are using a mixture made of sugar, you should also mix in as much oxygen as possible by pouring it in high and splashing it well.
- If you are using fruit juice, also pour it into the bottle or bucket from as high as possible and run it through a strainer.
 Add yeast to the mixture you want to ferment. If you are using grain yeast, it is best to moisturize it first. Then stir the yeast into your mixture with a clean, sanitized spoon. If you use a water seal, it will bubble during fermentation. When the fermentation is almost done, the bubbling will diminish or stop completely when your mixture is fully fermented. Place the fermenting broth in a chamber with a temperature of about 27 ° to 29 ° C for the best, most efficient fermentation. If you don't want to set the heating that high, you can also heat the liquid with a heating belt or with a light bulb. Do not let the light shine directly on the liquid.
 - You can buy yeast specifically for distillation. This type of yeast works very well and produces a lot of ethanol during fermentation and less by-products and types of alcohol that are not desired. How much yeast you should use depends on the type of yeast you have.
- There may be nutrients in the package with the yeast. Yeast nutrients are needed if you are using a mixture that does not contain as many nutrients on its own, such as sugar mixtures, but they can also improve fermentation of nutrient-dense mixtures such as grain mixtures.
 Collect the fermented liquid. Pour the fermented alcoholic liquid into a cleaned and sanitized bucket or bottle or directly into the still. Make sure you don't add yeast that is on the bottom. It can burn if you heat the still. You can also sieve the fermented liquid or filter it in another way before distilling it.
Part 4 of 6: Choosing a still
 Try to use a column still if possible. Column boilers are more complex and further developed than alembic boilers. You can buy your boiler or you can make your own. Whichever you choose, column and alembic kettles work in a similar way:
 - Cooling water is usually circulated through a sealed part in the distillation column. This condenses the evaporated alcohol and the other ingredients in the column. This means that there must be a direct water supply to get the water into the still.
- If you don't reuse the water and circulate it several times, it can take thousands of liters of water to make just a little bit of vodka. If you reuse the water, it costs about 200 liters of water. But the warmer the water, the less effective it becomes.
- Below the article are some links to English websites explaining how to make a column still and how to use it exactly. You can also look up this information on the internet.
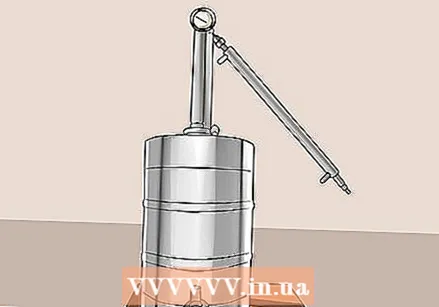
 If you cannot find or make a column kettle, you can also use an alembic kettle. A simple alembic kettle looks a bit like a pressure cooker with a number of pipes attached to it. They are cheap and very easy to assemble. Unlike column kettles, which are basically upright columns, alembic kettles sometimes use bent or wrapped tubes that you can immerse in a bucket of cooling water. You do not necessarily have to use pumps and large amounts of cooling water.
 - Below the article are some links to English websites explaining how to make a pot still and how to use it exactly. You can also look up this information on the internet.
Part 5 of 6: Distilling
 Prepare for the distillation. Still kettles heat the fermented liquid with a relatively low alcohol content until it reaches a temperature higher than the boiling point of alcohol but lower than the boiling point of water. In this way, the alcohol evaporates while most of the water does not. The evaporated alcohol (and that part of the water that has evaporated anyway) goes up the column, pipe or tube of the boiler. That column, pipe or tube is cooled from the outside with cold water so that the evaporated alcohol cools down and condenses and thus becomes a liquid again. This alcoholic liquid is collected and becomes your vodka.
  Heat the fermented liquid in the kettle to start the distillation process. How you should heat your boiler depends on what type of boiler you have. It can be done on a gas burner, wood fire or an electric hob. The desired temperature is 78.3 ° C at sea level, but the temperature is allowed anyway do not exceed the boiling point of water, 100 ° C. As the fermented liquid heats, the alcohol and other substances evaporate and condense again in the water-cooled part of the still.
  Discard the first bit. The first bit of distilled liquid contains many harmful substances such as methanol and other dangerous chemicals that you do not want to drink. If you are distilling 19 liters of liquid, you must discard the first 30 ml of distilled liquid.
 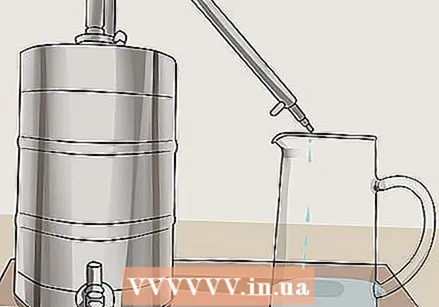 Collect the good alcohol. After you discard the first bit, the next amount of distilled liquid will contain the desired ethanol alcohol along with some water and other substances. If you are using a column kettle with flowing cooling water, you can adjust the amount of cooling water you use to affect the amount and quality of the distilled liquid.Try to make sure that the amount of liquid that comes out of your kettle is between two and three teaspoons per minute. If too much is distilled too quickly, the quality can deteriorate.
 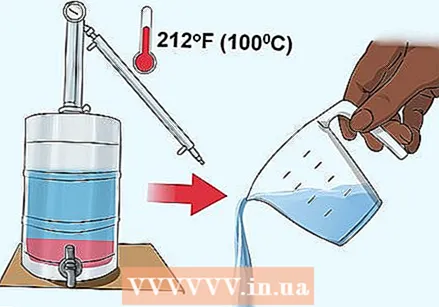 Discard the last bit as well. Towards the end of the distillation when the temperature rises to around 100 ° C or above, bad chemicals are again being produced. This last bit contains fusel oil. This last bit is therefore not good and must be thrown away.
  Check the alcohol percentage and purity of the distilled liquid. Cool some of your distilled liquid to about 20 ° C and use a hydrometer to determine its alcohol content. The distillate may contain too little alcohol (less than 40 percent alcohol) or it may be too concentrated (greater than 50 percent alcohol). Vodka is usually diluted before bottling, so the distillate can have a very high alcohol content. The distillate can also have too much flavor or be too aromatic and so may need to be distilled again or filtered with activated charcoal.
  Distill the distillate again if necessary or desired. This increases the alcohol percentage and purifies the distillate more. It is very common to distill the distillate 3 times or more to get a vodka that is of high purity.
Part 6 of 6: Final steps
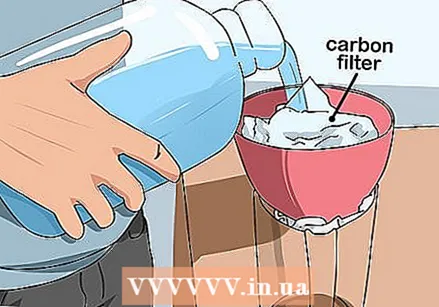 Treat the distillate with an activated carbon filter if necessary. Pour the distillate through a carbon filter, which you can buy on the internet, for example, to remove unwanted flavors and aromas. A carbon water filter can also be adapted to increase the purity of your distillate.
  Dilute the vodka until it has the right strength. Add demineralized water to your vodka until it has the desired alcohol percentage. Use a hydrometer to measure the alcohol percentage.
  Bottle the vodka. Fill bottles with your vodka and seal them with a cork or cap. The best way to do this is to siphon and tilt the bottle as you fill it. You can then make your own labels if you want. You can also buy a special machine to fill your bottles, but that is expensive and if you produce for home use, it is better to bottle by hand.
Tips
- Flavor can be added to vodka.
- If you're using a kettle, keep in mind that chemicals from plastic, rubber, and the lead from solder and other metals can get into your vodka during distillation.
- Excellent small stills are made in New Zealand.
- The pH of your slurry may need to be adjusted with gypsum or other substances so that the enzymes that convert starch into sugars can work better.
- Distilling drinks at home is illegal in the Netherlands. Brewing wine and beer is allowed.
Warnings
- Really throw away the first 5% of your distillate! This most likely contains a very high concentration of all waste that boils faster than ethanol. If you drink this part you could very well go blind or even die from it.
- The bottle, bucket, or vessel in which you ferment your mash or mixture can build up pressure and cause them to explode. Distillation devices are usually not closed, pressurized systems, so do not allow pressure to build up.
- Distilling alcohol without a license is illegal in most countries, including the Netherlands. If you produce on a small scale for your own use, there is probably nothing wrong, but do not sell your own alcohol.
- Still boilers need to be heated and you can do this with a fire. This can lead to injuries or explosions, especially since alcohol is flammable. If there is a leak in your boiler or if alcohol or alcohol vapor comes into contact with a fire, there is a high chance that this will lead to an explosion or fire. Therefore, for safety reasons, it is better not to do the distilling at home.
- Alcohol is flammable and can be poisonous.
- Producing and drinking alcohol under the age of 18 is illegal in most countries.


