Author:
Judy Howell
Date Of Creation:
1 July 2021
Update Date:
11 May 2024

Content
Why not do a photo shoot at home instead of going to the studio? You can then give your own twist to the photos and save hundreds of euros. With a photo camera, a window and a few household items, anyone can create a professional looking photo session at home.
To step
Part 1 of 4: The environment
 Choose the location for your "studio". Find a white wall, preferably in a room with lots of natural light. If you don't have a white wall, or yours is covered with photos, hang a white sheet from the ceiling to the floor and drape the rest over the floor. This will create a studio-like blank background for your photo shoot.
 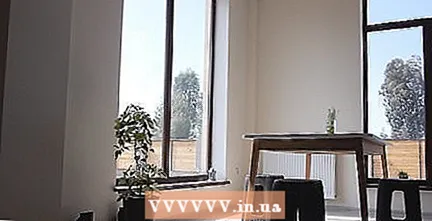 Open the curtains and let the sunlight flood into the room. Exposure is by far the most important factor in creating a professional photo shoot, and natural light helps create the best effect.
 - To start, schedule your photo shoot when you know that enough sunlight will enter the room for the next several hours. That way, you don't have to rush the photo session.
- If the light from outside is very bright, diffuse it with a plain white curtain or a thin white sheet. This creates a softer light and prevents harsh shadows.
- Even on cloudy days, the sun should provide enough light for your photo shoot.
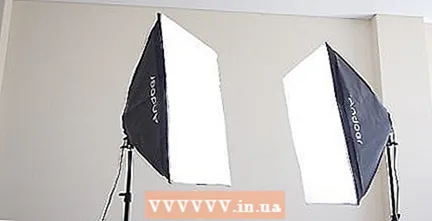 Look for lamps with a hood that is closed on one side. Desk lamps, for example, often have a hood that is closed on one side, so that you can direct the light to a specific place.
 - Also consider purchasing shop lamps, which artists and photographers use precisely for this purpose. These are expensive and can be obtained at the hardware store or at a photo store. If you want to hold photo sessions at home more often, this is a worthwhile investment.
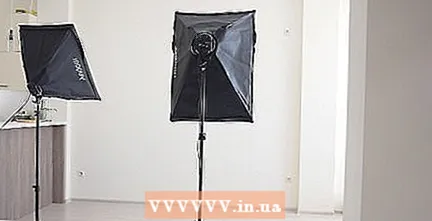 Create a professional ambiance. Use the lamps to fill the room with soft light without shadows.
 - A light should shine towards the ceiling, creating a warm glow against the white of the wall. This should shine softly from above on your subject.
- Use a different light as a “fill light”; place it in the back of the room, far enough from the subject to avoid casting a shadow.
- Both types of lighting can be used in conjunction with diffused natural light. The various light sources create an optimal setting for a professional photo session.
- Don't use ceiling lights, as they create harsh shadows on your subject.
- You can use an umbrella, cloth, or other material to muffle or filter out the lights.
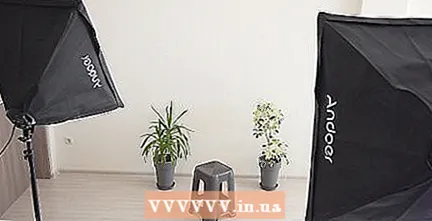 Collect some attributes that are meaningful. A simple wooden chair for the subject may be all you need, or you may want to give the photo shoot a fun theme. Gather all the materials you need and tastefully arrange them in front of you on the white backdrop.
Part 2 of 4: The model
 Decide what "look" you want to give the model. Whether you have hired someone as a model or are photographing a family member, consider in advance what kind of clothing the model will be wearing. Is it a photo session with costumes or a more general session? Keep in mind that people look best in photos when they feel comfortable in the clothes they wear.
 - You can ask your model to wear different types of clothing. If you take photos for your daughter's yearbook, you can, for example, take photos of her wearing a dress, or her favorite outfit and her basketball kit. Collect attributes that match the different clothes.
- Hair and makeup are also important components when it comes to creating a professional effect. Don't forget that make-up looks better in real life than in the picture, which means that your model puts on a slightly brighter lipstick or a little more eyeliner than usual.
 Set up your photo camera. Whether you are using a digital camera or a regular one, in both cases, make sure that the settings are set correctly before starting the photo session. Consider the exposure and the effect you are trying to achieve.
 - Most digital still cameras have an “automatic” setting. This should be sufficient in most cases, but make sure the flash is turned off. You've already controlled the exposure, so there's no reason to use the flash.
- Have a tripod or flat surface ready. Make sure it is set at the right angle for professional looking photos.
 Print your photos on glossy paper. If you have a printer at home, you can buy photo paper and print the photos from your computer. If you want a more professional finish, you can take them to a photo store to have them printed there.
 - Take your photos with a photo camera with rolls of film, then take the rolls to a photo shop afterwards to have them developed.
Tips
- Take a self-portrait by using the timer function on your photo camera. Sit on a chair in your "studio" and pose some distance away.
- The rules for lighting apply both outdoors and indoors: it is important to avoid shadows as much as possible and to create an ambiance with soft light. Umbrellas and other tools to diffuse light are useful when you have a photo session outside.
- Experiment with different backgrounds / backdrops. For a different effect, try a patterned rug or colored sheet.
Necessities
- A photo camera
- A tripod or flat surface on the same height as a tripod
- A white wall or sheet
- An assortment of lamps


