Author:
Eugene Taylor
Date Of Creation:
15 August 2021
Update Date:
10 May 2024

Content
- To step
- Part 1 of 3: Caring for a spoon plant
- Part 2 of 3: Repotting a spoon plant
- Part 3 of 3: Fixing ailments of spoon plants
- Tips
- Warnings
- Necessities
Because they are relatively easy to maintain and their pure white flowers are beautiful to look at, the spoon plant, also known as Spathiphyllum, is one of the most popular types of houseplants. Recently, the spoon plant has been put in the spotlight by NASA for its air-purifying properties. Providing scoop plants with their water, soil and sun needs and keeping them healthy will ensure you get the most out of them.
To step
Part 1 of 3: Caring for a spoon plant
 Choose a spot for your spoon plant. Spoon plants are native to hot, moist, shady tropical rainforests. As a result, they cannot be kept outside all year round in most temperate climates. But indoors, where it is usually relatively warm and humid compared to the outside environment, the plant can thrive. The spoon plant is best placed close to, but not directly in a window in a warm room in the house, where it can benefit from indirect sunlight. Windows facing north or west are best, as they don't have direct sunlight all day long. Try to avoid giving your plant cold air or too much sun, as this can cause the plant to become unhealthy and develop brown, withered leaves.
 - Depending on the weather conditions, you can put your spoon plant outside for part of the year on a shady patio or similar place where it is warm and humid. In a tropical environment it is possible to put the plant outside all year round.
 Give the spoon plant enough water. The best service you can do to your spoon plant is to water it regularly. When the potting soil is dry (and only then), water enough to moisten it, but not enough to get standing water on it. With too little water, your plant will wilt and die. If you fail to water your plant, you will begin to see it visibly drooping. But too much water can cause root rot, which can be fatal to the plant. Focus on watering about once a week, when the soil is dry. Sometimes it is recommended to even wait until the plant starts to wilt very slightly before watering it.
  Mist the leaves several times a week with a spray bottle. Spoon plants thrive in the high humidity of the tropics, so in addition to watering the soil, spray your spoon plant regularly with a spray bottle to mimic the moist air of the rainforest. Water your plant more frequently during the summer growing season - the more water you can water the flowers, the healthier they will be.
  Trim any unhealthy leaves from your plant. Compared to certain other plants, spoon plants do not need to be pruned very often. Regardless, if for any reason one or more of your spoon plant's stems or leaves turn brown or wilt, it is wise to trim the foliage to prevent the plant from wasting more energy on the dying appendage. Use sharp scissors to remove unhealthy or dead spots - cut straight and as close to the ground as possible without removing excess healthy foliage.
 - Brown or wilting leaves are usually a sign that you have forgotten to water your plant, but it could also be a symptom of something more serious. If you find yourself pruning often, even if you take good care of your spoon plant, watch for signs of a more serious problem (see Remedy ailments of spoon plants below) and look for the ultimate cause.
 If you fertilize, do it carefully. In addition to water and indirect sunlight, your plant does not require much maintenance. Fertilizers and nutritional supplements should not be necessary for a healthy, thriving spoon plant. But if you decide to do it (for example, because you want to grow particularly large, vibrant flowers), make sure not to over-fertilize, as spoon plants can be quite sensitive plants. About once a month, use a standard 20-20-20 houseplant fertilizer at half or a quarter of the recommended strength, in the spring and summer, when the plant's growth is most active.
 - Green flowers are a sign of over-fertilization. If your plant shows this symptom, stop fertilizing and divide your fertilizer dose in half for the next growing season.
Part 2 of 3: Repotting a spoon plant
 Repot your spoon plant. Like almost all potted plants, if given the chance, spoon plants will eventually grow too tall to thrive in their original pot. When your spoon plant grows too big for its pot, it needs more and more water and / or the leaves turn yellow for no apparent reason. You may also see the roots coming to the surface of the soil. In general, spoon plants should be repotted every year or every other year, so if it's about that time and you see one or more of the symptoms above, it is probably time to repot.
  Use a suitable size pot. When you repot a spoon plant, you will naturally use a larger pot than it had before, so that your plant has more room to spread its roots and grow. Use a pot about 2 inches (5 cm) larger in diameter than the previous pot - a relatively small magnification can give a plant enough room to grow for years to come.In general, spoon plants will never need pots larger than four inches in diameter, so if your pot is larger than that and the spoon plant still has troubling symptoms, something else could be going on.
 - Almost any material pot is good - ceramic, plastic and clay will all do just fine.
- Make sure your pot has one or more drainage holes in the bottom. It is essential that water can drain from the pot - if that cannot be done your spoon plant will be at risk of root rot.
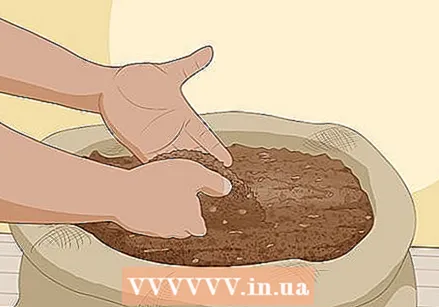 Use a suitable potting soil. As mentioned above, spoon plants originally come from tropical rainforests. They usually grow under a thick, multi-layered foliage and are therefore constantly surrounded by digesting plant material. When choosing a potting soil, choose one that has this quality. Use a peat-based potting soil with composted bark, with sand or perlite. It is best if your soil is light and resilient (to form good drainage) and has little to no odor.
 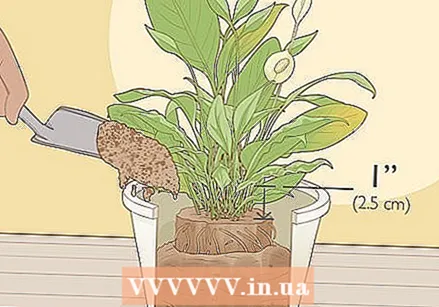 Move your plant to its new pot. Prepare your new pot by filling it with enough compacted soil for your plant to stand on it easily. It would be best if you only put soil around the sides of the plant, and nothing underneath or on top of it. Press your soil gently so that it will firmly support your plant without collapsing. Pry or dig your spoon plant out of the pot and place it on top of the soil in the new pot. Add soil from the original jar around the plant in its new pot - using familiar soil can ease the plant's move to the new pot. Water your plant and add more soil when the water causes the soil to settle in the pot. When the move is complete, the soil in the new pot should be about 1/2 inch to 1/2 inch below the rim of the pot.
 - If you are struggling to get your plant out of its old pot without breaking it or pulling it loose, water it generously and let it soak for an hour.
 Use a stick to support the new plant. After it has been repotted, the roots of your plant will not immediately have a firm grip in the new soil. This can make it difficult for your plant to stay upright. If you find it difficult to balance your plant, use a sturdy wooden stick to keep the spoon plant's stem upright. Bury the stake in the potting soil (taking care not to damage the roots of the plant) and use a wire to secure the stake to the stem. Remove the stalk when the plant's own roots are firm again and it is able to stay upright on its own.
  To form two separate plants, plant one part from the old plant. If, rather than repotting, you want to grow a whole new plant in a different pot, tear off a cutting from the plant and plant it in the new pot, instead of the whole plant. The cuttings of a spoon plant are groups of two or more leaves that are clearly separated from the main part of the plant.
 - To remove a cutting from your main spoon plant, first remove the whole plant from its pot. Work from the top of the cutting to the roots, loosening the roots of the cutting from the roots of the main plant. This can take some time and lead to accidentally broken roots - this is common, but try to avoid it as much as possible. When you have completely detached the cutting from the main plant, place it in its own small pot (no larger than 6 inches in diameter), as you would with a normal spoon plant.
Part 3 of 3: Fixing ailments of spoon plants
 Recognize the signs of too little or too much watering. One of the most common causes of problems in the cultivation of spoon plants is improper watering policies. Underwatering and overwatering can produce a number of nonspecific symptoms that sometimes overlap with other ailments of the spoon plant. However, since improper watering is also the easiest to fix, you should try these remedies before moving on to a more drastic solution.
 - Too little watering should be fairly obvious: dry soil accompanied by wilting, yellowing leaves and a drooping stem is all very obvious. Fix this by spraying and watering more regularly - both at least once a week. Be aware that plants growing out of their pots will have a hard time absorbing the water they need.
- Overwatering can be a little more difficult to diagnose, but is often characterized by brown leaf tips. Be aware that too much watering can lead to root rot, a separate and much more serious condition.
 Repot a plant with root rot. Root rot is a serious condition that can get any potted plant with roots below the surface and kill the plant easily. Generally, root rot is caused by a plant suffering from over-watering or poor drainage. If the roots are exposed to standing water for a long time, it can become difficult for them to get the air they need to function properly, and as a result they will literally rot. Certain types of microorganisms, called water fungi, contribute to the spread of root rot. The spores thereof can spread root rot to another plant if sufficient moisture is present. Root rot is often fatal, but, to try and fix it, immediately remove your spoon plant from the pot and remove any dead, slimy, or otherwise rotting parts of the roots. Place the plant in a new pot with dry soil and good drainage.
 - Although root rot infects the plant underground, it will cause the plant to begin to visibly die above the ground. If your spoon plant starts to wilt more, even with enough sunlight and regular water, root rot is likely to be to blame.
- As a solution, you can also choose to transfer one of the cuttings from the spoon plant to another pot, if the roots are not affected. The original plant may die, but the second will be a genetic copy of the first.
 Use insecticidal soap to get rid of pests such as lice or mites. Spoon plants are sometimes susceptible to infection from lice, mites and other small arthropods. If you notice that the leaves of your spoon plant are starting to wilt or die, especially if accompanied by visible pests, a sticky, slimy discharge or the presence of white tissue, then it is likely that your plant has a pest infection. Use a strong jet of water to spray the pests off the plant, then to make sure they don't come back, use a plant-safe insecticide or this homemade insecticide soap recipe.
 - Mix one tablespoon (15 ml) of vegetable oil, three tablespoons (16 grams) of cayenne pepper, and one tablespoon (12 grams) of craft soap (not liquid dish soap, think Marseille soap or Sunlight) in a quart of warm water. Use a spray bottle to completely spray your plant, but test this on a small area of the plant first and let the soap sit there for a day to make sure it doesn't cause damage.
 Clean or dispose of any fungal plant. Fungal infections can range from harmless to potentially fatal. If you see a white or gray fuzzy growth on the top of the soil then don't be very concerned as this fungus is not a danger to the plant (although it can irritate people, especially if they are prone to allergies) . To remove this minimal mold growth, you can try sprinkling cinnamon (this has anti-fungal properties) on the mold. However, if the spoon plant itself starts to develop a dark or black coat on the stem or leaves for no apparent reason (frost, damage, etc.) then your plant is likely to have a serious fungal infection.
 - Disposing of the whole plant is always a reasonable choice in this case, as fungal spores can be very persistent and remain in the soil and environment for extended periods of time, where they can infect other plants. However, if you want to try to save the plant, carefully remove all affected parts of the plant and dispose of them where they are no longer a hazard (such as your garbage). Then water the plant with compost tea, a natural anti-fungal, to try to kill the spores left in the soil.
Tips
- Watch the leaves for signs of what it may need. If the leaves start to droop, or the bottom leaves start to turn yellow and wither, then you will need to water. If the leaves start to turn yellow, the plant may be getting too much sunlight. Move him to a darker place.
Warnings
- While beautiful, spoon plants are poisonous. The leaves in particular are very toxic to humans and animals, so keep them away from children and pets.
Necessities
- Peace Lily
- Water
- Spray bottle


