Author:
Frank Hunt
Date Of Creation:
14 March 2021
Update Date:
15 May 2024

Content
- To step
- Part 1 of 3: Paper plates
- Method 1: A written blackboard
- Method 2: A sign with cut out letters and numbers
- Part 2 of 3: Wooden signs
- Part 3 of 3: Designing the board
- Tips
- Warnings
- Necessities
A Ouija board is a flat surface printed with letters, numbers and other symbols that is used to answer people's questions during a séance. Participants place their fingertips on a board or other movable object that then moves across the board to spell out messages.
To step
Part 1 of 3: Paper plates
Method 1: A written blackboard
 Write the letters of the alphabet, the numbers 0 to 9, and the words "Yes," "No," "Hello" and "Goodbye" on a large piece of paper.
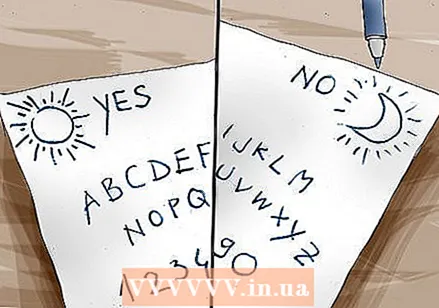 Write the letters in a circle. Draw a sun in the top left corner and write the word "Yes" next to it. Draw a moon in the top right corner and write the word "No" next to it. Then place the numbers outside the circle on a table. Place an inverted drinking glass on the paper and use it as a pointer.
  Sit at the table with some friends. Everyone puts their hand lightly on the upside-down glass. Decide who will ask the questions. Another can then take notes.
Method 2: A sign with cut out letters and numbers
 Write down all the letters of the alphabet in one or two rows. Make sure the letters are big enough for everyone to read.
 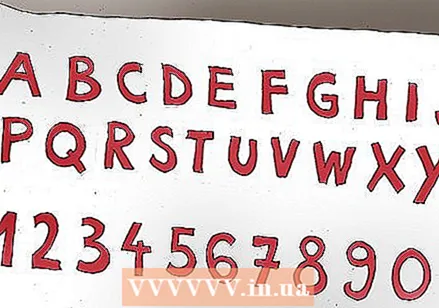 Write down the numbers 0 to 9 in the row below.
 Write down the words "Yes," "No," "Hello" and "Goodbye" to make it easier for you to communicate with the spirits. You can also add other words and phrases if you wish.
  Cut out the letters, numbers, words and phrases.
 Glue them to a piece of paper in the way you intended.
 Provide a smooth surface so that the pointer can slide across the board. Glass or an insert case should work fine.
  Ready! You are now ready to have your first séance with your Ouija board.
Part 2 of 3: Wooden signs
 Gather your supplies. You will need a smooth and sanded wooden board, paint, varnish (or some other clear lacquer) and a soldering iron (with a tip that you can calligraphy or a similar tip). Paper and pencil are also useful.
  Practice. Soldering irons are a bit tricky to use. First, practice on a scrap piece of wood so you can see how slow to move the point and how hard to press the point on the wood. You can also figure out how to move the soldering iron to make different shapes.
  Prepare the plate. Make sure the wood is clean and smooth.
  Draw your design on the board. You can draw the design freehand or you can use a sidekick. You can trace the letters, numbers, and symbols on tracing paper or you can buy ink stamps at a craft store.
 - Make sure your designs aren't too small or too detailed, especially if you don't have very much experience working with a soldering iron.
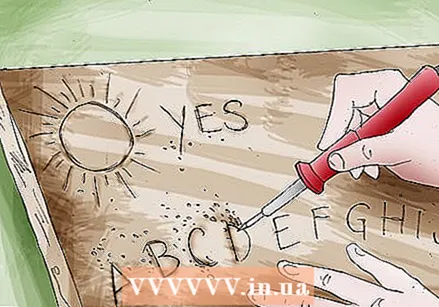 Go over the designs with the soldering iron. Draw over the designs with the soldering iron. Don't be in a hurry. Look at the sign in different types of light to make sure it looks good.
  Let the plate cool down and clean the surface. Let the burnt parts cool, then brush off any excess material from the board. Erase pencil marks and other marks and gently wipe the entire surface with a slightly damp cloth. Let the plate dry before continuing.
  Paint the surface. You can create a smooth surface with the help of the varnish or other transparent lacquer. This is necessary to allow the board to slide over the board. Whatever polish you choose to use, carefully follow the manufacturer's instructions. You will probably need to apply several coats of lacquer and it will take a long time for each coat to dry properly. So plan a lot of time for making this piece of work.
  Add more details. After the varnish has completely dried, you can paint even more details on the board. It is best to paint the details in the second to last coat of varnish. The varnish must then be transparent and not colored.
Part 3 of 3: Designing the board
 Choose a layout for the board. You can organize your plate in different ways. The design is not that important as long as you have all the necessary symbols. You must use at least the letters of the alphabet, the numbers 0 to 9 and the words "Yes," "No," "Hello" and "Day".
 - Use the traditional layout if you prefer. In this division the letters are in two slightly curved lines in the middle of the board. The words "Yes" and "No" appear above these lines, and the numbers and the word "Day" below.
- You can also use a diamond layout. In this layout, the letters are placed in a diamond shape on the board, with each of the four corners of the diamond ending in the center of one side of the board. The numbers are placed inside the diamond shape and the corners are for the words (there is room for an extra sentence, such as "Not now").
- You can also use a circular layout. This is similar to the diamond layout, but uses an oval shape instead.
 Choose a font. Choose a font that matches the design of your Ouija board. Gothic fonts are a great choice, as are many Wild West based fonts. However, you can also choose what you like best. To test out a font, type some text into a word processor to see what you like best.
  Choose decorations. Many people think it is a good idea to place certain symbols in the corners or in other places on your board. Opinions differ, but common symbols include the moon, sun and stars, the symbols for the different elements, the symbols for the different planets and symbols or images in quantities that are important according to numerology (12, 13, 7 , 3, etc.).
 - You can also decorate your plate with physical items, such as candle holders, stones that you attach to the plate (quartz is a good idea), or places where you can place the various elements (a bowl of water, a branch, and so on).
 Choose colors. Choose a color combination for your plate. Dark colors and earth colors are generally better at calling on ghosts. However, if you want to connect with particularly happy spirits, then there's nothing wrong with using colors that you think they'll like. If you want to connect with a specific person, choose their favorite color.
 - Choose colors that clearly contrast with each other. Of course you want to be able to see your text easily.
 Choose a plank. You need a board (where you put your hands on) to use your Ouija board. You can use one from another board you get cheaply from a euro store, or you can make your own.
Tips
- Some people believe that ghosts are real and that if you are not careful you can anger the ghosts around you and get an unwanted visitor into your home. Treat the board with respect if you are concerned about it. Imagine a pure white light surrounding you to protect you.
- If things start to get creepy in the house, such as when things are moving, or if other things are happening that could be attributed to poltergeists, then it is safer to stop that night.
- Do not use the plate if you or your friends are nervous, tired, or if you are unwell. Spirits that are called up with the help of the board feel what you are feeling. You may be dealing with a demon. As long as you are all confident and feeling good, there should be nothing to worry about.
- When an evil spirit comes to play, say a prayer and stop that night. You may not believe in evil spirits, but you don't despise those who do! Just keep calm and remember it's your plate and not theirs.
- The quality of the answers you get while using the Ouija board depends on the quality of the questions that are asked. If you ask a serious question, you will also get a serious answer. If you ask a ridiculous question, you will also get a ridiculous answer.
- Nobody agrees whether Ouija boards are real or not. Some people believe that you can summon spirits from another world to answer questions, while others believe that you move the glass unconsciously. Be open to different explanations and respect the opinions of others.
- Remember that you are in control and there is nothing to fear except the fear itself.
- When you're done, place the pointer over the word "Day" and then fold or tuck the plate away. Some people believe it is better not to leave the sign open and exposed.
- To make a Ouija board with letters and numbers in a font traditionally used for Ouija boards, visit the Harold's Fonts website to download free fonts. Three available fonts for Ouija boards are "Cap'n Howdy," "Mystick Prophet," and "Sideshow." However, you don't have to limit yourself to those three fonts. There are hundreds of fonts to choose from.
Warnings
- The real danger lies in asking for physical proof that the ghosts you are trying to summon actually exist. When you ask for a sign, you literally open a door between the material and spiritual world and the spirits can enter our world. As a result, problems can arise later and often do.
- All attempts you make to communicate with the dead or other spirits should not be taken lightly. (That means you shouldn't try to talk to a particular ghost. Let the ghosts come to you and don't ask them to come to you). Summoning spirits is not something that should be done by people who have little or no experience with it. There are a lot of stories to be found on the internet. Take your time and read through a few before you consider playing with an Ouija board.
- Keep in mind that homemade Ouija boards made of wood generally work better than those made of paper. If the paper is bent or folded, the ghosts will be outraged and stay away. This is a good thing if you are too scared to summon spirits but your friend keeps pushing you. You just have to bend the paper and not tell your friend it won't work now.
- There is, of course, no scientific evidence that the above two points apply. Namely, the words are formed in the user's subconscious mind rather than through a "spiritual intervention" (or in some cases on purpose by the user to fool others). Although the results may be surprising, scientific evidence indicates that they are produced by a process similar to dreams or hallucinations in the user.
Necessities
- Scissors, a sheet of cardboard or craft paper, a pen or marker, and glue.


