Author:
Roger Morrison
Date Of Creation:
18 September 2021
Update Date:
9 May 2024

Content
- To step
- Method 1 of 3: Put on an English bridle
- Method 2 of 3: Put on a Western bridle
- Method 3 of 3: Troubleshooting
- Tips
- Warnings
While riding, a bridle helps with steering and lets a horse know what you want to do. Putting on a bridle on a horse can be a bit confusing at first, but it's easy once you get the hang of it. Make sure you put a well-fitting bridle on the horse so that it does not cause any discomfort.
To step
Method 1 of 3: Put on an English bridle
 Check if you have the correct size bridle. If this is your first time using this bit on this horse, it is important that you use the correct size bridle. The wrong size is not pleasant for the horse.
 - There are three sizes of bridles: pony, cob and full. Measure the horse's head from just behind the ears to the corner of the mouth, and compare this with the headpiece and cheekpiece.
- A bit that is too small can pinch the mouth.
- Too big a bit moved in the mouth. An oversized dressage bar or broken bit can damage the horse's palate.
 Fasten the halter around the neck (let the noseband hang loose). This ensures that your horse cannot run away without the halter getting in the way. Do not restrain your horse while doing this.
 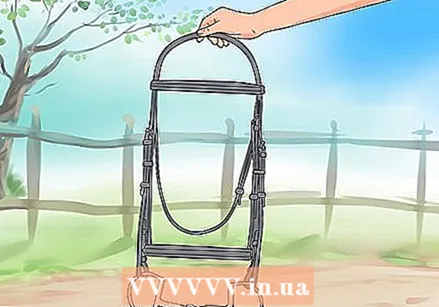 Grab and position the bridle. Grab the bridle in your left hand by the headpiece (upper part) and let the rest of the bridle hang. Move small straps to the outside of the cheek piece so they don't get tangled.
  Place the reins over your horse's neck.
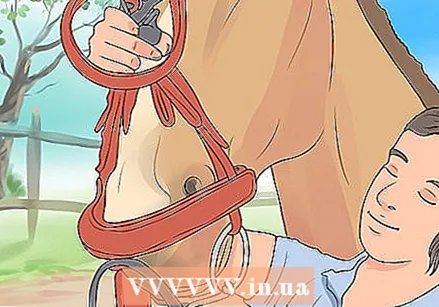 Switch hands. You now hold the bridle in your right hand.
 - Keep the bridle so that there is enough space between the cheek pieces. The headpiece is at the top and the nose and throat band hang down without knots.
- Make sure you hold on to all reins so that there are no loops for your horse to step into.
 Lower the horse's head to put in the bit. When he puts his head down, hold the bit in your left palm and your right forearm parallel to the top of the horse's neck (your hand is next to the ears). Gently press the bit against the horse's teeth, and if necessary, place your thumb in the horse's mouth to open the mouth.
 - If your horse doesn't lower his head or doesn't want to take the bit, you can give him a treat while presenting the bit. Hold the bridle in your right hand and hold the headpiece next to the horse's ears, and rest the bit and treat (a piece of apple or sugar cube) in your palm.
- Place the bit in the mouth. Keep the bit low wherever you hold your sugar cube or piece of apple. Place the bit against your horse's teeth, as close to the line where the top and bottom teeth meet. Hold your sugar cube against the bit.
- Make sure you hold the headpiece and can pull it over the ears when the horse takes the bit.
- Make sure the bit is in the horse's mouth before pulling the headpiece over the ears.
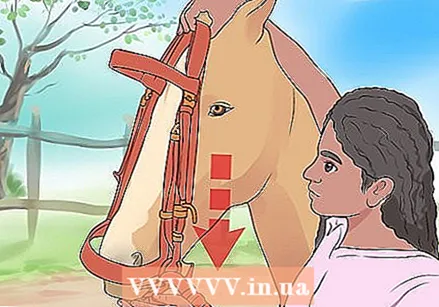
 Pull the headpiece over the horse's ears. You want to apply gentle pressure on the bit so that it does not fall out of the horse's mouth. Gently swipe the headpiece over the ears without hurting your horse. If this means pulling the ears under the cheek piece one at a time, do it gently.
 - Give your horse a reward for his good behavior. This is optional, and probably not necessary for calm, experienced horses.
 Adjust the browband. The browband should always rest flat against the horse's forehead. The correct position of the browband is approximately 2.5 to 5 cm below the base of the ears.
 - When adjusting the browband, you can also adjust the cheekpieces to ensure that the bridle is straight. Stand straight in front of your horse to check that the bridle is straight.
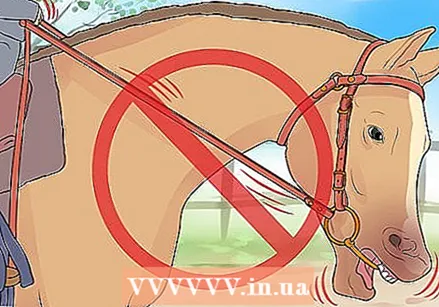
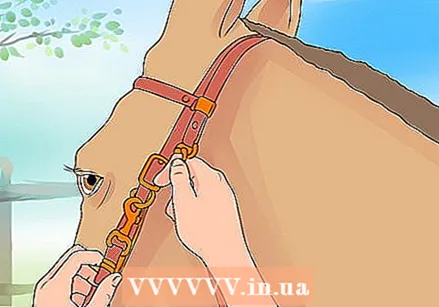 Fasten the throatlatch. The throatlatch is not there to hold the bridle in place and you should leave enough room to place four fingers between the throatlatch and the horse's neck. The throatlatch is intended as an extra measure to prevent the bridle from falling off. This means that the throatlatch must be loose enough to hang slack, even when the horse puts its head down.
 - Make sure you can place four fingers between the throatlatch and the horse, even when his neck is down. To remember how loose a throat latch should be, you can think of a necklace.
 Check the fit of the bridle. The browband should be flat and in the correct position (so that it does not press on the horse's forehead or ears). Check that the bit is neatly and evenly in the horse's mouth. There should be two wrinkles on each side of the horse's mouth. If there are too few wrinkles, you have to tighten the cheek pieces.
 - Make sure the bridle fits evenly around the horse's head. You can adjust the length of the cheek pieces to make the bridle even.
 Remove the halter when you are satisfied with the bridle's positioning. Remove the halter from the horse's neck by loosening the strap. Also remove the lead rope from the horse's neck.
 - Now check the length of the reins. They must be long enough to make contact with the horse's mouth as a rider.
 Lead your horse by removing the reins from the neck and holding it in your right hand. Lead the horse so that the horse is walking to your right and walk at cheek level. Hold the reins in your right hand about 6 inches below the bit.
 - Hold the end of the reins in your left hand.
Method 2 of 3: Put on a Western bridle
 Choose Western driving if you want to drive more informally. People use the Western style for rodeos and ranching. Western riding is much more common in the United States than in the Netherlands and Belgium, but western stables and riding schools can also be found here.
 - The nice thing about a western saddle is the button; you can hold on to this if you are an inexperienced rider.
 Check if you have the correct size bridle. If this is your first time using this bit on this horse, it is important that you use the correct size bridle. The wrong size is not pleasant for the horse.
 - There are three sizes of bridles: pony, cob and full. Measure the horse's head from just behind the ears to the corner of the mouth, and compare this with the headpiece and cheekpiece.
- A bit that is too small can pinch the mouth.
- Too big a bit moved in the mouth. An oversized dressage bar or broken bit can damage the horse's palate.
 Make sure both you and your horse are calm. A horse can sense your fear and this will make him nervous. Also imagine that it can be nerve-racking for a horse if someone pushes a metal bar into its mouth.
 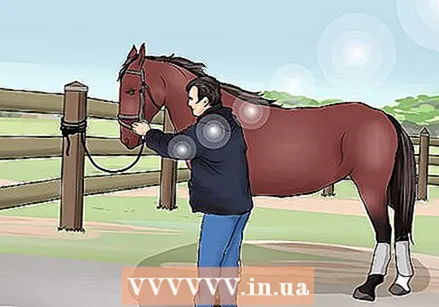 Secure your horse. You have to make sure your horse is secured somewhere. This means that you have to anticipate the moment when you take off the halter but have not yet put on the bridle. You must be able to keep control of your horse.
 - For a binding station, hold the bridle so that the front of the browband is facing forward (away from the horse). Drape the reins over the neck. Drop your left rein over the horse's neck so that it falls to the right. Drop the right rein so that it falls to the left. Let the bridle slide back onto your arm. Lift the head of the halter over the horse's ears and slide the noseband of the halter down from their face. Raise the crown and put it behind the ears. Reattach the halter so that it goes around the horse's neck.
- Use the reins to keep your horse with you. At "split reins" you can tie a knot and pull it over the horse's head to place the reins just behind the ears. Pull the headpiece of the halter over the horse's ears and remove the noseband from the horse.
 Lower the horse's head to put in the bit. You can offer him a piece of apple or a sugar cube to lower his head. Hold your hand just under the nose, with some treats in it. When the horse puts its head down, you can put the bit in its mouth.
 - Make sure you have the headpiece of the bridle in your right hand at an angle from the horse's left eye to his right ear.
 Place the bit in the mouth. Keep the bit low wherever you hold your sugar cube or piece of apple. Place the bit against your horse's teeth, as close to the line where the top and bottom teeth meet. Hold your sugar cube against the bit.
 - Make sure you hold the headpiece and can pull it over the ears when the horse takes the bit.
- Make sure the bit is in the horse's mouth before pulling the headpiece over the ears.
- Keep the bridle so that there is enough space between the cheek pieces. The headpiece is at the top and the straps hang down without knots.
 Pull the headpiece over the horse's ears. Apply gentle pressure as you pull the headpiece over the ears. Gently swipe the headpiece over the ears without hurting your horse. Pass the ears under the headpiece one by one. Do this by pushing the ears forward instead of back.
 - If you have a "one-ear" or "two-ear" bridle instead of a bridle with a regular browband, pull the ears one by one through the appropriate "earloops" (loops for the ears).
 Give your horse a reward. Always reward your horse for good behavior. This will encourage the horse to maintain good behavior while accepting the bridle and bit.
 - Sugar helps the horse to play with the bit, so sugar cubes are a good treat to have on hand while putting on the bridle.
 Remove the halter when the headpiece is around the ears.
 Fasten the throatlatch. The throatlatch is not there to keep the bridle in place. The throatlatch is intended as an extra measure to prevent the bridle from falling off. This means that the throatlatch must be loose enough to hang slack, even when the horse lowers its head.
 - Make sure you can place a fist between the throatlatch and the horse, even if the horse is lowering its head.
 Check the fit of the bridle. The browband should be flat and in the correct position (so that it does not press on the horse's forehead or ears). Check that the bit is neatly and evenly placed in the horse's mouth. There should be two wrinkles on each side of the horse's mouth. If there are too few wrinkles, you have to tighten the cheek pieces
 - Make sure the bridle fits evenly around the horse's head. You can adjust the length of the cheek pieces to make the bridle even.
- If you haven't already, fasten the noseband or curb chain.
- Now check the length of the reins. They must be long enough to make contact with the horse's mouth as a rider.
 Lead your horse by removing the reins from the neck and holding it in your right hand. Lead the horse so that the horse is walking to your right and walk at cheek level. Hold the reins in your right hand about 6 inches below the bit.
 - Hold the end of the reins in your left hand.
Method 3 of 3: Troubleshooting
 The horse resists the bit. Often the reason a horse resists the bit is a misunderstanding. They don't try to be naughty, but there is something about the bit that they find annoying.
 - The bit may have the wrong taste. Horses prefer copper bits because of the taste. Unfortunately, copper bits don't last as long as other bits, and copper bits should be checked regularly for sharp edges and dents.
- The bit may be too cold. You also don't want to get a cold piece of metal shoved in your mouth. Neither does your horse. Try to warm the bit between your hands before placing it in the horse's mouth.
 Train your horse to open his mouth for the bit. Sometimes your horse doesn't want to open his mouth because the bit is too cold or has the wrong taste, but often a little practice can help. Make sure the behavior you want to see is reinforced.
 - Teach your horse to be comfortable with the command. Choose a command to make the horse open its mouth. Touch your horse to give the command. Say "yes" so that they link the touch with good behavior. Give your horse a treat when you take your fingers away.
- Show your horse that he is getting a treat. Make sure your horse is tied up. Approach the horse's head from the left and walk where your horse can see you. Stay at an angle in the same direction as your horse. Hold a treat in your left hand. Command your horse and say "open" while gently pressing two fingers against his lower lip. Say "yes", remove your fingers and give your horse the piece of apple or sugar cube.
- Repeat these steps four or five times, or until you think your horse gets it.
- Do the same as above, but now keep constant pressure, placing your fingers just below his upper lip. When the horse opens his mouth say "yes" and give him the treat. Practice until your horse gets it.
- Let your horse allow you to put a bit in his mouth. Show the bit to your horse (not attached to a bridle). Let your horse smell and touch it. Then do the same as above, give your horse the command. Place the bit in the horse's mouth when he opens his mouth. Remove the bit and give your horse a treat.
 Keep your horse calm. One of the most important factors in successfully putting on the bridle is keeping both yourself and your horse calm. A nervous horse may try to bite, throw their head, hit with the hooves, or try to run away. With a very nervous horse, wait to put on the bridle until the horse has calmed down.
 - Avoid fluttering the reins, especially around the eyes and ears. This can make a horse nervous or scared.
Tips
- When you put your fingers in the horse's mouth, press where there are no teeth so the horse can't bite you. If you press on the gum there, the horse will open its mouth.
- If you have a horse that is giving you some problems, such as holding its head up, gently squeeze the base of the ears and the horse will lower its head. If he doesn't, place a hand on his nose bridge and say the word "low" in a stern tone. He needs to respond.
- Usually, with all types of bridles, you place the reins over the horse's neck while you put the bridle on.
- When purchasing a new bridle, it is important to keep a few holes, because the bridle will stretch a bit. You may also have to adjust the bit of the horse.
- Horses are more likely to accept the bit if they associate it with a treat, you can try putting honey or mint on the bit.
- Stay calm and don't panic. You can always adjust the bridle.
Warnings
- Do not leave your reins on the ground, as your horse could trip over the reins, endangering both the horse and yourself.
- Never tie your horse to anything with a bridle. Leather is not strong enough to hold back a hanging horse and if the bridle breaks, the metal parts of the bridle can be a hazard.
- Horses can be unpredictable at times. When you put on the bridle you will get close to the teeth, so be careful.
- Do not walk directly behind a horse, just at a safe distance. When you scratch out the hooves, stand on the side of the horse yourself.


