Author:
Morris Wright
Date Of Creation:
28 April 2021
Update Date:
13 May 2024
Content
- To step
- Method 1 of 3: Optimize Windows 10 performance
- Method 2 of 3: Improve Windows 8 performance
- Method 3 of 3: Optimize Windows 7 performance
- Tips
We all know how frustrating it can be when a PC is slow and it takes an infinite amount of time to complete the simplest tasks. A slow computer wastes time, effort, and money in the long run. While you can always hire a technician to fix your Windows PC and get it running smoothly, in many cases you can fix your system yourself.
To step
Method 1 of 3: Optimize Windows 10 performance
 Turn off transparency effects. These special effects look impressive, but they consume too many resources from your PC. Turn off these effects and opt for the classic Windows look instead to speed up the computer.
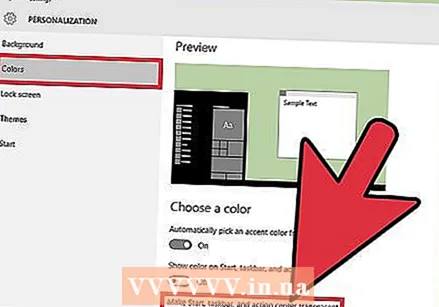
 - Right click on the desktop.
- Select "Customize".
- Select "Colors".
- Uncheck "Make Start, Taskbar and Action Center transparent".
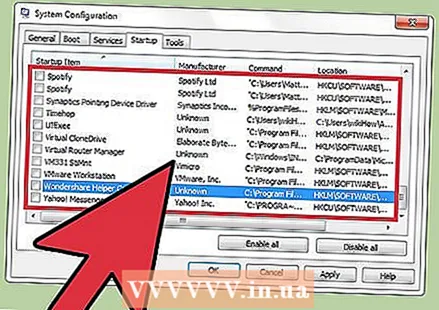
 Disable startup programs. Many programs contain a component that runs automatically at startup. While this is useful for programs you use often, running unwanted software during startup can slow down your computer. Disable these launchers as follows:
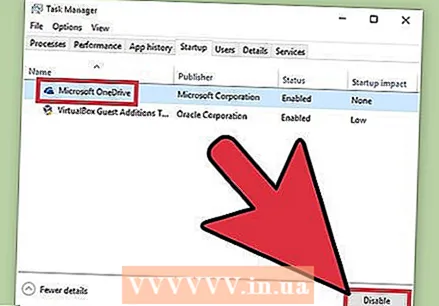
 - Right-click the Start button.
- Click on "Task Manager"
- Click on "Startup"
- Select the program you want to disable.
- Click on "Disable".
 Turn off unnecessary services. Some services are essential to the operation of Windows. While many Windows-specific features are enabled by default, there are a few that you don't really need. You can temporarily or permanently disable these services.
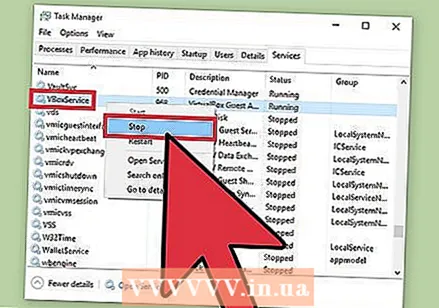
 - Right-click on the Start button.
- Click on "Task Manager".
- Click on "Services".
- Right-click on the service you want to disable.
- Select "Stop".
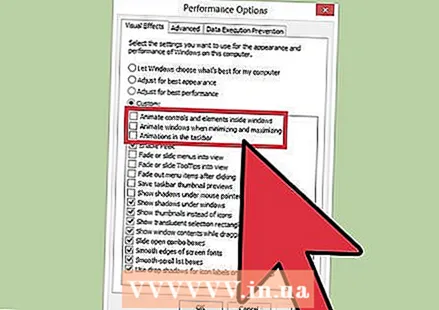
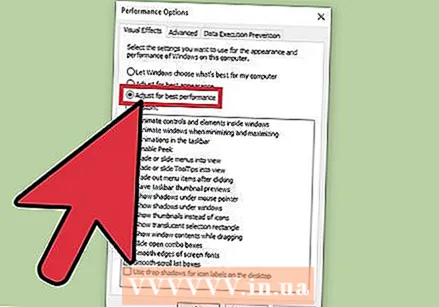 Turn off shadows and animations. Shadows and animations look nice on the screen. However, they put an unnecessary burden on the CPU (Central Processing Unit).
 - Choose "System"
- Click on "Advanced System Settings".
- Click on the "Advanced" tab.
- Under "Performance", click the "Settings" button.
- Click on "Adjust for Best Performance". You can also turn off any effect manually.
- Alternatively, go to Settings> Accessibility> Other options. Once here you can turn off animations.
 Enable fast startup. Windows 10 offers you this handy feature to speed up your computer. When a PC shuts down, Windows will save a copy of your loaded drivers and the kernel in a separate file called a "sleep file". When the system is rebooted, the system can simply load this file, reducing the boot time.
 - Right-click on the Start button.
- Go to "Control Panel".
- Choose "System and Security".
- Click on "Power Options".
- Click on "Control the behavior of the power buttons".
- Click "Enable Fast Startup (Recommended)". This can be found under Shutdown settings.
- Click on "Save Changes".
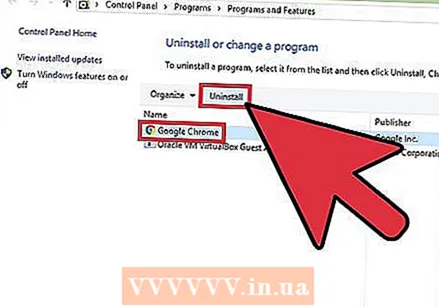 Remove unnecessary programs. It is better to remove programs that you no longer use. Sometimes we install trial versions of software, which we then forget to remove after the trial period has expired. Such programs take up memory and eventually slow down the computer.
 - Right-click on the Start button.
- Click on "Programs and Features".
- Select the software you wish to remove.
- Click on "Remove / Change".
 Defrag your hard drive. Learn how to defrag Windows 10.
 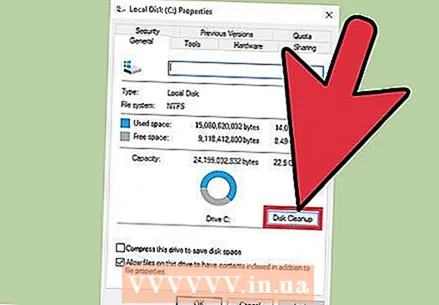 Clean your computer regularly. Disk Cleanup is a great Windows built-in tool. This allows you to delete unnecessary files from your PC.
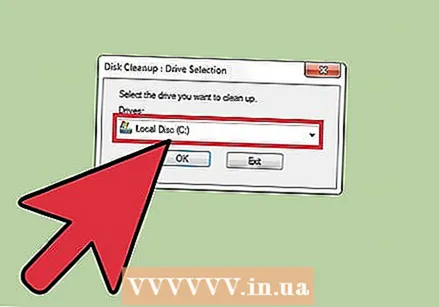
 - Click on the Start button.
- Click on "File Explorer".
- Right click on local disk (C :).
- Choose "Properties".
- Click on "Disk Cleanup". You can find this under the "General" tab.
- Click on "Unnecessary files".
- Once you are done, click "OK".
- Advanced users can take advantage of the "Clean up system files" feature.
Method 2 of 3: Improve Windows 8 performance
 Turn off animations. Animations, which are so much a part of Windows 8, can cause some sort of lag as you move from screen to screen. If you want to disable animations, do the following:
 - Click on the Windows key.
- Type your "System Performance Properties".
- Click on "Enter".
- Uncheck the "Window animations" box.
- If desired, turn off other animations as well.
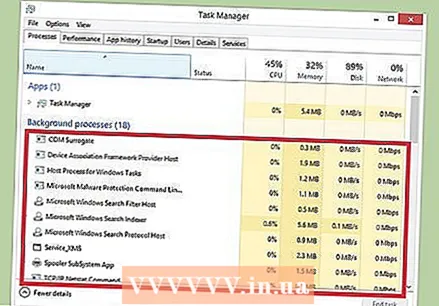 Find out which apps are using the most resources. You can use Task Manager to find out which programs are using the most resources.
 - Right-click on the desktop taskbar.
- Select "Task Manager".
- Click on "More information" in case you want to see the full interface.
- Apps that use a lot of resources are highlighted.
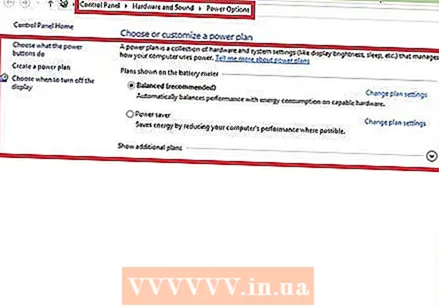 Change the Power Options settings. Windows offers a Power Management program that you can use to optimize the amount of power consumed by your PC. This allows your computer to save energy for maximum performance.
 - Click on the battery icon. This is visible on the taskbar of your PC.
- Choose "More Options".
- Select three power plans, namely, Balanced (this provides full performance and saves idle energy), Energy Saver (saves energy by reducing system performance), and High Performance (maximizes performance and response time).
- You can change your plan by clicking on the link "Change settings for this power plan".
- To configure an existing schedule, you can select / change the power plan for sleep mode and display.
- If you want to create a custom plan, go to the "Create a power plan" window. Give it a name and click "Next". Then proceed to configure your settings.
 Change the Windows indexing settings. Windows 8 maintains and constantly updates files and folders to speed up search results. While this is useful, information you don't often need can eventually slow down your PC. Here's how to turn Indexing off:
 - Click on Start.
- Type Indexing. Then you will see the currently indexed locations.
- Click the Change button.
- Uncheck the locations that you do not want indexed.
- To disable indexing on a drive, open Computer and right-click on the local disk.
- In the General tab, uncheck the box that says "The content and properties of files on this drive may be indexed".
- Choose all folders and sub-folders that you do not want indexed.
- Restart your computer for the changes to take effect.
 Optimize your PC's hard drives. In Windows 8, Disk Defragmenter can be found as "Optimize Drives". You can optimize your PC's hard drives as follows:
 - Click on the Charms bar.
- Click on "Optimize Stations". This will open a new dialog, with a list of drives.
- Select a station of your choice.
- Click on Optimize. This will start the defragmentation process.
- You can also have this process performed automatically.
- Click on Change Settings.
- Select the "Scheduled Run" check box.
- Click OK to save your schedule.
Method 3 of 3: Optimize Windows 7 performance
 Clean up your hard drive. Use a program such as Disk Cleanup to delete temporary files, system files, and all sorts of other files that you no longer use.
 - Open the Start menu.
- Type cleanmgr in the search box.
- Click on the Cleanmgr program.
- Indicate the station that you want to clean with the program.
- Click OK. This will start the process.
 Run the Performance Troubleshooter. This program fixes performance issues on your Windows PC and tries to speed up computers.
 - Click on the Start button.
- Click on "Control Panel".
- Click "Detect and Fix Problems" under "System and Security".
- Click "Check for performance issues".
- The Performance Wizard window opens. Click "Next" and wait for the problem to be diagnosed.
- In case the troubleshooter recommends that you check programs to improve your PC's performance, click "Next".
- See "View Detailed Information" for a detailed report of potential issues.
- If you want to close the wizard, all you have to do is click "Close".
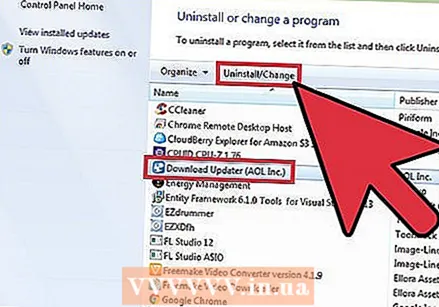 Uninstall and remove unused programs. Unused programs can eventually take up a lot of space on your computer, which can degrade its performance over time. It is advisable to remove such programs.
 - Click on the Start button.
- Click on "Control Panel".
- Under "Programs", click "Remove a program". A list of all your programs will appear.
- Click on the program you want to remove and then click "Remove". You can find this tab at the top of the menu.
 Limit the number of programs at startup. Many programs are designed to run automatically at startup. While this is useful for programs you use often, unnecessary software running at startup can use a lot of memory, ultimately slowing down your PC. You can manage startup programs in several ways.
 - Press Win-r on the desktop.
- Type msconfig in the "Open" field.
- Hit Enter.
- Click on Startup.
- Uncheck the items you do not want to run on startup.
- When you are done, click OK.
- In the pop-up window that appears, click Restart. This will restart your computer to complete the process.
 Defrag your hard drive. Regularly defragmenting your hard drive keeps the files on your computer tidy, creating more space on the drive. Disk Defragmenter is a great built-in tool specially developed for this purpose.
 - Click on the Start button.
- In the Search box, type Disk Defragmenter.
- Click Disk Defragmenter.
- Under Current status, select the drive you want to defragment.
- Click Analyze Disk. This will let you know if you need to defrag that particular drive.
- After Windows has finished analyzing the disk, it will show you the percentage of fragmentation on the disk. If that number is higher than 10 percent, you need to defragment the disk.
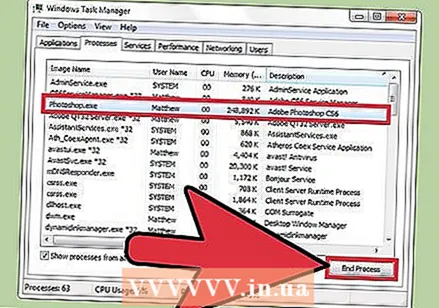 Run fewer programs at the same time. Your PC's performance can suffer when too many programs are running at the same time. Try to work with fewer programs at the same time.
 - Press Ctrl + Shift + Esc to open Task Manager.
- Click Processes. This will show you a list of Processes running on your PC.
- Scroll down for the full list of programs.
- Check the name and description to identify each program.
- Check the Memory column to see how much memory is being used by each process.
- Right-click on any running process and choose "End Process". This will close the program.
 Only run one antivirus program at a time. Running two or more antivirus programs can slow down your computer over time.
 - The Windows Action Center will usually notify you if you are running more than one antivirus program.
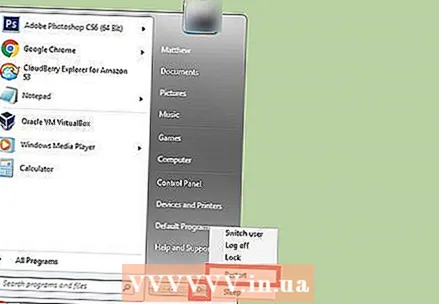 Restart your PC regularly. Restart the computer at least once a week. This helps clear the memory and properly shut down any running programs running in the background with or without your knowledge.
Tips
- It is desirable to create a backup plan for your PC. This way you always have a backup of your files should something seriously go wrong with your system.
- If you suspect that recent software or an update is slowing down your system, you can use System Restore to restore your system to an earlier date.


